概述
Azkaban由LinkedIn开发实现,用以解决Hadoop作业依赖问题。 从ETL工作到数据分析产品,都需要按顺序运行作业作业。
最初是单一服务器解决方案,随着多年来Hadoop用户数量的增加,Azkaban已经发展成为更鲁棒的解决方案。
Azkaban由三个关键组成部分组成:
- 关系数据库(MySQL)
- AzkabanWebServer
- AzkabanExecutorServer

关系数据库(MySQL)
Azkaban使用MySQL存储它的大部分状态,AzkabanWebServer和AzkabanExecutorServer都会访问数据库。
AzkabanWebServer如何使用数据库?
Web服务器使用数据库的原因如下:
- 项目管理 - 项目管理,项目权限控制,上传的文件等。
- 执行流程状态 - 跟踪执行流程,跟踪执行流程的执行者。
- 上一个流程/作业 - 搜索以前执行的作业和流程,以及访问其日志文件。
- 调度程序 - 保存预定作业的状态
- SLA - 保存所有的SLA规则
AzkabanExecutorServer如何使用数据库?
执行者服务器使用数据库的原因如下:
- 访问项目 - 从数据库中检索项目文件。
- 执行流程/作业 - 检索并更新正在执行的流程的数据。
- 日志 - 将作业和流程的输出日志存储到数据库中。
- 互流依赖性 - 如果流在另一个执行器上运行,它可从数据库中获取状态。
没有理由不选择MySQL,它是一个广泛使用的数据库。我们也正在实现与其他数据库的兼容性,尽管对历史运行作业的搜索要求从关系数据存储更方便。
AzkabanWebServer
AzkabanWebServer是所有Azkaban的主要管理者。它处理项目管理,认证,调度程序和执行监控。 它也可以作为网络用户界面。
使用Azkaban很容易。Azkaban使用*.job键值属性文件来定义工作流程中的各个作业,并使用_dependencies_属性来定义作业的依赖关系链。这些作业文件和相关代码可以存档到*.zip并通过网络服务器通过Azkaban UI或curl上传。
AzkabanExecutorServer
先前版本的Azkaban在单个服务器中同时具有AzkabanWebServer和AzkabanExecutorServer功能。目前,执行者已经被分离到它自己的服务器中。分离这些服务有几个原因:我们很快就可以扩展执行次数,并在执行失败时重新运行Executors。此外,我们能够对Azkaban进行升级,而对用户的影响最小。随着Azkaban的使用增长,我们发现升级Azkaban变得越来越困难,因为一天中的所有时间都变成“高峰”。
使用入门
在3.0版本中,我们提供了三种模式:独立的“独立服务器”模式,较重的两服务器模式和分布式多执行器模式。以下描述这几种模式之间的区别。
在独立服务器模式下,数据库是嵌入式的H2数据库,并且Web服务器和执行器服务器都在相同的进程中运行。如果只想尝试一下,这应该很有用。它也可以用于小规模场景。
对于两服务器模式适用于更严肃的生产环境。其数据库应该由主从设置的MySQL实例提供支持。Web服务器和执行器服务器应运行在不同的进程中,以便升级和维护不应影响用户。
对于多执行器模式适用于更严肃的生产环境。其数据库应该由主从设置的MySQL实例提供支持。Web服务器和执行器服务器应运行在不同的进程中,以便升级和维护不应影响用户。这种多主机设置为Azkaban带来了强大且可扩展的方面。
以下是关于如何设置Azkaban启动的说明。
从源代码构建
Azkaban构建使用Gradle(使用gradlew即Gradle包装器)可运行时自动下载),并且需要Java 8或更高版本。
以下命令在Linux,OS X等*nix平台上运行。
  # Build Azkaban
  ./gradlew build

  # Clean the build
  ./gradlew clean

  # Build and install distributions
  ./gradlew installDist

  # Run tests
  ./gradlew test

  # Build without running tests
  ./gradlew build -x test
这些都是标准的Gradle命令。请查看Gradle文档以获取更多信息。
Gradle在项目目录内创建.tar.gz文件。例如./azkaban-solo-server/build/distributions/azkaban-solo-server-0.1.0-SNAPSHOT.tar.gz。使用tar -xvzf path/to/azkaban-*.tar.gz解压缩。
Solo服务器入门
独立服务器是Azkaban的独立实例,也是最简单的开始。独立服务器具有以下优点
- 易于安装 - 不需要MySQL实例。它使用H2作为其主要的持久性存储。
- 易于启动 - Web服务器和执行器服务器都在相同的过程中运行
- 全功能 - 它包装所有的Azkaban功能。您可以正常使用它并为其安装插件
安装Solo服务器
按照以下步骤开始。- 克隆仓库:运行
git clone https://github.com/azkaban/azkaban.git - 构建Azkaban并创建安装运行
cd azkaban; ./gradlew build installDist - 启动服务器:运行
cd azkaban-solo-server/build/install/azkaban-solo-server; bin/azkaban-solo-start.sh - 停止服务器:运行
bin/azkaban-solo-shutdown.sh从azkaban-solo-server安装目录中
另请参阅从源代码构建 。
独立服务器安装应包含以下目录。
| 文件夹 | 描述 |
|---|---|
| bin | 启动/停止Azkaban的Jetty服务器的脚本 |
| conf | Azkaban独立服务器的配置文件 |
| lib | Azkaban的jar依赖关系 |
| extlib | 添加到extlib的其他jar将被添加到Azkaban的类路径中 |
| plugins | 可以安装插件的目录 |
| web | Azkaban web服务器的网页(css,javascript,image)文件 |
在conf在conf目录中,应该有三个文件:
azkaban.private.properties- 由Azkaban用于运行时参数azkaban.properties- 由Azkaban用于运行时参数global.properties- 作为共享属性传递给每个工作流和作业的全局静态属性。azkaban-users.xml- 用于添加用户和角色以进行身份验证。 如果XmLUserManager未设置为使用此文件,则不使用此文件。
其中azkaban.properties文件将成为主配置文件。
获取SSL的KeyStore(可选)
Azkaban独立服务器默认情况下不使用SSL。但是,您可以在独立的Web服务器中以相同的方式进行设置。具体如下:
Azkaban的Web服务器可以使用SSL套接字连接器,这意味着密钥库必须可用。您可以按照此链接提供的步骤进行操作([http://docs.codehaus.org/display/JETTY/How+to+configure+SSL](http://docs.codehaus.org/display/JETTY/How+to+configure+SSL))来创建一个。 一旦创建了密钥库文件,Azkaban必须被赋予它的位置和密码。在_azkaban.properties_中,以下属性应该被覆盖。
jetty.keystore=keystore
jetty.password=password
jetty.keypassword=password
jetty.truststore=keystore
jetty.trustpassword=password
设置UserManager
Azkaban使用UserManager提供身份验证和用户角色。默认情况下,Azkaban包含并使用XmlUserManager,它可从_azkaban-users.xml_中获取用户名/密码和角色,如azkaban.properties文件中所示。
user.manager.class=azkaban.user.XmlUserManageruser.manager.xml.file=conf/azkaban-users.xml
运行Web服务器
在azkaban.properties中的以下属性用于配置jetty。
jetty.maxThreads=25
jetty.ssl.port=8081
执行bin/azkaban-solo-start.sh启动独立服务器。要关闭,请运行bin/azkaban-solo-shutdown.sh
在浏览器中打开http://localhost:8081/index链接
数据库设置
目前,Azkaban2仅使用MySQL作为其数据存储,尽管我们正在评估其他可能的存储系统。
1. 安装MySQL
这些说明不包含MySQL DB的安装,但您可以访问MySQL文档站点上的说明。
2. 设置数据库
为Azkaban创建一个数据库。例如:
# Example database creation command, although the db name doesn't need to be 'azkaban'
mysql> CREATE DATABASE azkaban;
为Azkaban创建一个数据库用户。例如:
# Example database creation command. The user name doesn't need to be 'azkaban'
mysql> CREATE USER 'username'@'%' IDENTIFIED BY 'password';
设置数据库的用户权限。 为Azkaban创建一个用户(如果尚未创建),并为Azkaban数据库中的所有表赋予用户INSERT,SELECT,UPDATE,DELETE权限。
# Replace db, username with the ones created by the previous steps.
mysql> GRANT SELECT,INSERT,UPDATE,DELETE ON <database>.* to '<username>'@'%' WITH GRANT OPTION;
配置数据包大小可能需要配置。默认情况下,MySQL可能有一个可接受的低数据包大小。为了增加它,你需要将属性max_allowed_packet设置为更高的值,比如1024M。
要在linux中配置它,请打开/etc/my.cnf 。在mysqld之后的某处,添加以下内容:
[mysqld]
...
max_allowed_packet=1024M
要重新启动MySQL,您可以运行...
$ sudo /sbin/service mysqld restart
3. 创建Azkaban表
从下载页面下载azkaban-sql-script tarball。表创建脚本包含在此存档中。
在MySQL实例上运行单个表创建脚本来创建表。或者,只需运行create-all-sql脚本。以update为前缀的任何脚本都可以忽略。
4. 获取JDBC连接器Jar包
出于各种原因,Azkaban不会分发MySQL JDBC连接器jar。你可以从这个链接下载jar包。
Web服务器和执行程序服务器都需要此jar,并应将其放入两个服务器的/extlib目录中。
设置Azkaban Web服务器
Azkaban Web服务器处理项目管理,认证,调度和执行触发。
安装Web服务器
从下载页面抓取azkaban-web-server软件包
或者,您可以克隆GitHub仓库,您可以从主分支构建最新版本。有关从源代码构建的说明,请参阅此处
将包解压缩到一个目录中。安装路径应该与AzkabanExecutorServer不同。提取后,应该有以下目录:
| 文件夹 | 说明 |
|---|---|
| bin | 启动Azkaban的Jetty服务器的脚本 |
| conf | Azkaban独立服务器的配置 |
| lib | Azkaban的jar依赖关系 |
| extlib | 添加到extlib的其他jar将被添加到Azkaban的类路径中 |
| plugins | 可以安装插件的目录 |
| web | Azkaban Web服务器的网页(css,javascript,image)文件 |
在conf目录中,应该有三个文件
azkaban.properties- 由Azkaban用于运行时参数global.properties- 作为共享属性传递给每个工作流和作业的全局静态属性。azkaban-users.xml-用于添加用户和角色以进行身份验证。 如果XmLUserManager未设置为使用此文件,则不使用此文件。
其中azkaban.properties文件将是设置Azkaban所必需的主配置文件。
获取SSL的KeyStore
Azkaban使用SSL套接字连接器,这意味着密钥库必须可用。 您可以按照此链接提供的步骤创建一个。
一旦创建了密钥库文件,Azkaban必须被赋予它的位置和密码。在azkaban.properties中下面的属性应该被覆盖。
jetty.keystore=keystore
jetty.password=password
jetty.keypassword=password
jetty.truststore=keystore
jetty.trustpassword=password
设置数据库
如果你还没有得到MySQL的JDBC驱动程序,你可以从这个链接中获得它。
将此jar放入extlib目录。所有的外部依赖应该被添加到extlib目录中。
要将Azkaban Web客户端指向MySQL实例,您需要将连接参数添加到azkaban.properties。
database.type=mysql
mysql.port=3306
mysql.host=localhost
mysql.database=azkaban
mysql.user=azkaban
mysql.password=azkaban
mysql.numconnections=100
目前MySQL是Azkaban中唯一支持的数据存储类型。所以database.type应该总是mysql。
设置UserManager
Azkaban使用UserManager提供身份验证和用户角色。/p>
默认情况下,Azkaban包含并使用XmlUserManager,它可以从azkaban.properties文件中看到从azkaban-users.xml获取用户名/密码和角色。
user.manager.class=azkaban.user.XmlUserManager
user.manager.xml.file=conf/azkaban-users.xml
运行Web服务器
在azkaban.properties中的以下属性用于配置jetty。
jetty.maxThreads=25
jetty.ssl.port=8443
执行bin/azkaban-web-start.sh启动AzkabanWebServer。
要关闭AzkabanWebServer,请运行bin/azkaban-web-shutdown.sh。
您可以通过浏览器访问Web服务器来测试访问权限。
设置Azkaban执行程序服务器
Azkaban执行器服务器处理工作流和作业的实际执行。
安装Executor服务器
从下载页面抓取azkaban-exec-server软件包。
或者,您可以克隆,您可以从主分支构建最新版本。有关从源代码构建的说明,请参阅此处。
将包解压缩到一个目录中。安装路径应该与Azkaban Web服务器不同。提取后,应该有以下目录。
| 文件夹 | 描述 |
|---|---|
| bin | 启动Azkaban的Jetty服务器的脚本 |
| conf | Azkaban独立服务器的配置 |
| lib | Azkaban的jar依赖关系 |
| extlib | 添加到extlib的其他jar将被添加到Azkaban的类路径中 |
| plugins | 可以安装插件的目录 |
在conf目录中,我们只需要配置azkaban.properties文件。
该文件是设置Azkaban执行程序所必需的主要配置文件。
设置数据库
如果你还没有得到MySQL的JDBC驱动程序,你可以从这个链接中获得它。
将此jar放入extlib目录。所有的外部依赖应该被添加到extlib目录中。
要将Azkaban Web客户端指向MySQL实例,您需要将连接参数添加到azkaban.properties。
database.type=mysql
mysql.port=3306
mysql.host=localhost
mysql.database=azkaban
mysql.user=azkaban
mysql.password=azkaban
mysql.numconnections=100
目前MySQL是Azkaban中唯一支持的数据存储类型。所以database.type应该总是mysql。
配置AzabanWebServer和AzkabanExecutorServer客户端
执行服务器需要设置一个端口,AzabanWebServer需要知道这个端口是什么。
需要在AzkabanExecutorServer的azkaban.properties上设置以下属性。
# Azkaban Executor settings
executor.maxThreads=50
executor.port=12321
executor.flow.threads=30
单一执行器模式
默认情况下,executor.port设置为12321。 AzkabanWebServer也必须指向这个端口。
这是通过在AzkabanWebServer的azkaban.properties设置以下属性完成的。
executor.port=12321
多执行器模式
如果我们想要在多执行器模式下运行,我们需要在web服务器配置中启用多执行器模式。请确认您在azkaban.properties中有以下属性。azkaban.use.multiple.executors和azkaban.executorselector.comparator.*是必需的属性。请注意,单azkaban.use.multiple.executors不符合多执行器模式。
azkaban.use.multiple.executors=true
azkaban.executorselector.filters=StaticRemainingFlowSize,MinimumFreeMemory,CpuStatus
azkaban.executorselector.comparator.NumberOfAssignedFlowComparator=1
azkaban.executorselector.comparator.Memory=1
azkaban.executorselector.comparator.LastDispatched=1
azkaban.executorselector.comparator.CpuUsage=1
这些更改只有在重新启动服务器后才会启动。
运行Executor服务器
执行bin/azkaban-exec-start.sh启动AzkabanExecutorServer。
要关闭AzkabanExecutorServer,请运行bin/azkaban-exec-shutdown.sh。
配置多执行器模式的执行程序
在这个时间点我们没有执行者管理界面。执行器需要在数据库中配置。举些例子:-
将所有执行程序插入到执行程序设置的mysql数据库中。验证executors表中正确的执行程序是否处于活动状态。
insert into executors(host,port) values("EXECUTOR_HOST",EXECUTOR_PORT);
设置Azkaban插件
Azkaban is designed to make non-core functionalities plugin-based, so that- they can be selectively installed/upgraded in different environments without changing the core Azkaban, and
- it makes Azkaban very easy to be extended for different systems.
Right now, Azkaban allows for a number of different plugins. On web server side, there are
- viewer plugins that enable custom web pages to add features to Azkaban. Some of the known implementations include HDFS filesystem viewer, and Reportal.
- trigger plugins that enable custom triggering methods.
- user manager plugin that enables custom user authentication methods. For instance, in LinkedIn we have LDAP based user authentication.
- alerter plugins that enable different alerting methods to users, in addition to email based alerting.
On executor server side
- pluggable job type executors on AzkabanExecutorServer, such as job types for hadoop ecosystem components.
We recommend installing these plugins for the best usage of Azkaban. A set of common plugins are available to download from the download page. Alternatively, by cloning the GitHub repo, you can run ant in different plugin directories to create tar ball packages.
Below are instructions of how to install these plugins to work with Azkaban.
User Manager Plugins
By default, Azkaban ships with the XMLUserManager class which authenticates users based on a xml file, which is located at conf/azkaban-users.xml.
This is not secure and doesn't serve many users. In real production deployment, you should rely on your own user manager class that suits your need, such as a LDAP based one. The XMLUserManager can still be used for special user accounts and managing user roles. You can find examples of these two cases in the default azkaban-users.xml file.
To install your own user manager class, specify in Azkaban2-web-server-install-dir/conf/azkaban.properties:
user.manager.class=MyUserManagerClass
and put the containing jar in plugins directory.
Viewer Plugins
HDFS Viewer Plugins
HDFS Viewer Plugin should be installed in AzkabanWebServer plugins directory, which is specified in AzkabanWebServer's config file, for example, in Azkaban2-web-server-install-dir/conf/azkaban.properties:
viewer.plugins=hdfs
This tells Azkaban to load hdfs viewer plugin from Azkaban2-web-server-install-dir/plugins/viewer/hdfs.
Extract the azkaban-hdfs-viewer archive to the AzkabanWebServer ./plugins/viewer directory. Rename the directory to hdfs, as specified above.
Depending on if the hadoop installation is turned on:
- If the Hadoop installation does not have security turned on, the default config is good enough. One can simply restart
AzkabanWebServerand start using the HDFS viewer. - If the Hadoop installation does have security turned on, the following configs should be set differently than their default values, in plugin's config file:
| Parameter | Description |
|---|---|
azkaban.should.proxy |
Whether Azkaban should proxy as another user to view the hdfs filesystem, rather than Azkaban itself, defaults to true |
hadoop.security.manager.class |
The security manager to be used, which handles talking to secure hadoop cluster, defaults to azkaban.security.HadoopSecurityManager_H_1_0 (for hadoop 1.x versions) |
proxy.user |
The Azkaban user configured with kerberos and hadoop. Similar to how oozie should be configured, for secure hadoop installations |
proxy.keytab.location |
The location of the keytab file with which Azkaban can authenticate with Kerberos for the specified proxy.user |
For more Hadoop security related information, see HadoopSecurityManager
Job Type Plugins
Azkaban has a limited set of built-in job types to run local unix commands and simple java programs. In most cases, you will want to install additional job type plugins, for example, hadoopJava, Pig, Hive, VoldemortBuildAndPush, etc. Some of the common ones are included in azkaban-jobtype archive. Here is how to install:
Job type plugins should be installed with AzkabanExecutorServer's plugins directory, and specified in AzkabanExecutorServer's config file. For example, in Azkaban2-exec-server-install-dir/conf/azkaban.properties:
azkaban.jobtype.plugin.dir=plugins/jobtypes
This tells Azkaban to load all job types from Azkaban2-exec-server-install-dir/plugins/jobtypes. Extract the archive into AzkabanExecutorServer ./plugins/ directory, rename it to jobtypes as specified above.
The following setting is often needed when you run Hadoop Jobs:
| Parameter | Description |
|---|---|
hadoop.home |
Your $HADOOP_HOME setting. |
jobtype.global.classpath |
The cluster specific hadoop resources, such as hadoop-core jar, and hadoop conf (e.g. ${hadoop.home}/hadoop-core-1.0.4.jar,${hadoop.home}/conf) |
- If the hadoop installation does not have security turned on, you can likely rely on the default settings.
- If the Hadoop installation does have kerberos authentication turned on, you need to fill out the following hadoop settings:
| Parameter | Description |
|---|---|
hadoop.security.manager.class |
The security manager to be used, which handles talking to secure hadoop cluster, defaults to azkaban.security.HadoopSecurityManager_H_1_0 (for hadoop 1.x versions) |
proxy.user |
The Azkaban user configured with kerberos and hadoop. Similar to how oozie should be configured, for secure hadoop installations |
proxy.keytab.location |
The location of the keytab file with which Azkaban can authenticate with Kerberos for the specified proxy.user |
For more Hadoop security related information, see HadoopSecurityManager
Finally, start the executor, watch for error messages and check executor server log. For job type plugins, the executor should do minimum testing and let you know if it is properly installed.Property Overrides
Azkaban job is specified with a set of key-value pairs we call properties. There are multiple sources for deciding which properties will finally be a part of job execution. Following table lists out all the sources of properties and their priorities. Please note that if a property occur in multiple sources, then its value from high property source will be used
Following properties are visible to the users. These are the same properties which are merged to form jobProps in AbstractProcessJob.java
| PropertySource | Description | Priority |
|---|---|---|
global.properties in conf directory |
These are admin configured properties during Azkaban setup. Global to all jobtypes. | Lowest (0) |
common.properties in jobtype directory |
These are admin configured properties during Azkaban setup. Global to all jobtypes. | 1 |
plugin.properties in jobtype/{jobtype-name} directory |
These are admin configured properties during Azkaban setup. Restricted to a specific jobtype. | 2 |
common.properties in project zip |
These are user specified property which apply to all jobs in sibling or descendent directories | 3 |
| Flow properties specified while triggering flow execution | These are user specified property. These can be specified from UI or Ajax call but cannot be saved in project zip. | 4 |
{job-name}.job job specification |
These are user specified property in actual job file | Highest (5) |
Following properties are not visible to the users. Depending on jobtype implementation these properties are used for constraining user jobs and properties. These are the same properties which are merged to form sysProps in AbstractProcessJob.java
| PropertySource | Description | Priority |
|---|---|---|
commonprivate.properties in jobtype directory |
These are admin configured properties during Azkaban setup. Global to all jobtypes. | Lowest (0) |
private.properties in jobtype/{jobtype-name} directory |
These are admin configured properties during Azkaban setup. Restricted to a specific jobtype. | Highest (1) |
azkaban.properties is another type of properties which are only used for controlling Azkaban webserver and execserver configuration. Please note that jobProps, sysProps and azkaban.properties are 3 different types of properties and are not merged in general (depends on jobtype implementation).
Upgrading DB from 2.1
If installing Azkaban from scratch, you can ignore this document. This is only for those who are upgrading from 2.1 to 2.5.
The update_2.1_to_3.0.sql needs to be run to alter all the tables. This includes several table alterations and a new table.
Here are the changes:
-
Alter project_properties table'
- Modify 'name' column to be 255 characters
- Create new table triggers
Importing Existing Schedules from 2.1
In 3.0, the scheduling system is merged into the new triggering system. The information will be persisted in triggers table in DB. We have a simple tool to import your existing schedules into this new table.
After you download and install web server, please run this command once from web server install directory:
$ bash bin/schedule2trigger.sh
Upgrading DB from 2.7.0
If installing Azkaban from scratch, you can ignore this document. This is only for those who are upgrading from 2.7 to 3.0.
The create.executors.sql, update.active_executing_flows.3.0.sql, update.execution_flows.3.0.sql, and create.executor_events.sql needs to be run to alter all the tables. This includes several table alterations and two new table.
Here are the changes:
-
Alter active_executing_flows table'
- Deleting 'port' column
- Deleting 'host' column
-
Alter execution_flows table'
- Adding an 'executor_id' column
- Create new executors table
- Create new executor events table
Configuration
Azkaban can be configured in many ways. The following describes the knobs and switches that can be set. For the most part, the there is no need to deviate from the default values.
Azkaban Web Server Configurations
These are properties to configure the web server. They can be set in azkaban.properties.
General Properties
| Parameter | Description | Default |
|---|---|---|
azkaban.name |
The name of the azkaban instance that will show up in the UI. Useful if you run more than one Azkaban instance. | Local |
azkaban.label |
A label to describe the Azkaban instance. | My Local Azkaban |
azkaban.color |
Hex value that allows you to set a style color for the Azkaban UI. | #FF3601 |
web.resource.dir |
Sets the directory for the ui’s css and javascript files. | web/ |
default.timezone |
The timezone that will be displayed by Azkaban. | America/Los_Angeles |
viewer.plugin.dir |
Directory where viewer plugins are installed. | plugins/viewer |
job.max.Xms |
The maximum initial amount of memory each job can request. This validation is performed at project upload time | 1GB |
job.max.Xmx |
The maximum amount of memory each job can request. This validation is performed at project upload time | 2GB |
Multiple Executor Mode Parameters
| Parameter | Description | Default |
|---|---|---|
| azkaban.use.multiple.executors | Should azkaban run in multi-executor mode. Required for multiple executor mode. | false |
| azkaban.executorselector.filters | A common separated list of hard filters to be used while dispatching. To be choosen from StaticRemaining, FlowSize, MinimumFreeMemory and CpuStatus. Order of filter do not matter. | |
| azkaban.executorselector.comparator.{ComparatorName} | Integer weight to be used to rank available executors for a given flow. Currently, {ComparatorName} can be NumberOfAssignedFlowComparator, Memory, LastDispatched and CpuUsage as ComparatorName. For example:- azkaban.executorselector.comparator.Memory=2 | |
| azkaban.queueprocessing.enabled | Hhould queue processor be enabled from webserver initialization | true |
| azkaban.webserver.queue.size | Maximum flows that can be queued at webserver | 100000 |
| azkaban.activeexecutor.refresh.milisecinterval | Maximum time in milliseconds that can be processed without executor statistics refresh | 50000 |
| azkaban.activeexecutor.refresh.flowinterval | Maximum number of queued flows that can be processed without executor statistics refresh | 5 |
| azkaban.executorinfo.refresh.maxThreads | Maximum number of threads to refresh executor statistics | 5 |
Jetty Parameters
| Parameter | Description | Default |
|---|---|---|
| jetty.maxThreads | Max request threads | 25 |
| jetty.ssl.port | The ssl port | 8443 |
| jetty.keystore | The keystore file | |
| jetty.password | The jetty password | |
| jetty.keypassword | The keypassword | |
| jetty.truststore | The trust store | |
| jetty.trustpassword | The trust password |
Project Manager Settings
| Parameter | Description | Default |
|---|---|---|
| project.temp.dir | The temporary directory used when uploading projects | temp |
| project.version.retention | The number of unused project versions retained before cleaning | 3 |
| creator.default.proxy | Auto add the creator of the projects as a proxy user to the project. | true |
| lockdown.create.projects | Prevents anyone except those with Admin roles to create new projects. | false |
| lockdown.upload.projects | Prevents anyone but admin users and users with permissions to upload projects. | false |
MySQL Connection Parameter
| Parameter | Description | Default |
|---|---|---|
| database.type | The database type. Currently, the only database supported is mysql. | mysql |
| mysql.port | The port to the mysql db | 3306 |
| mysql.host | The mysql host | localhost |
| mysql.database | The mysql database | |
| mysql.user | The mysql user | |
| mysql.password | The mysql password | |
| mysql.numconnections | The number of connections that Azkaban web client can open to the database | 100 |
Executor Manager Properties
| Parameter | Description | Default |
|---|---|---|
| executor.port | The port for the azkaban executor server | 12321 |
| executor.host | The host for azkaban executor server | localhost |
| execution.logs.retention.ms | Time in milliseconds that execution logs are retained | 7257600000L (12 weeks) |
Notification Email Properties
| Parameter | Description | Default |
|---|---|---|
| mail.sender | The email address that azkaban uses to send emails. | |
| mail.host | The email server host machine. | |
| mail.user | The email server user name. | |
| mail.password | The email password user name. |
User Manager Properties
| Parameter | Description | Default |
|---|---|---|
| user.manager.class | The user manager that is used to authenticate a user. The default is an XML user manager, but it can be overwritten to support other authentication methods, such as JDNI. | azkaban.user.XmlUserManager |
| user.manager.xml.file | Xml file for the XmlUserManager | conf/azkaban-users.xml |
User Session Properties
| Parameter | Description | Default |
|---|---|---|
| session.time.to.live | The session time to live in ms seconds | 86400000 |
| max.num.sessions | The maximum number of sessions before people are evicted. | 10000 |
Azkaban Executor Server Configuration
Executor Server Properties
| Parameter | Description | Default |
|---|---|---|
executor.port |
The port for azkaban executor server | 12321 |
executor.global.properties |
A path to the properties that will be the parent for all jobs. | none |
azkaban.execution.dir |
The folder for executing working directories | executions |
azkaban.project.dir |
The folder for storing temporary copies of project files used for executions | projects |
executor.flow.threads |
The number of simulateous flows that can be run. These threads are mostly idle. | 30 |
job.log.chunk.size |
For rolling job logs. The chuck size for each roll over | 5MB |
job.log.backup.index |
The number of log chunks. The max size of each logs is then the index * chunksize | 4 |
flow.num.job.threads |
The number of concurrent running jobs in each flow. These threads are mostly idle. | 10 |
job.max.Xms |
The maximum initial amount of memory each job can request. If a job requests more than this, then Azkaban server will not launch this job | 1GB |
job.max.Xmx |
The maximum amount of memory each job can request. If a job requests more than this, then Azkaban server will not launch this job | 2GB |
azkaban.server.flow.max.running.minutes |
The maximum time in minutes a flow will be living inside azkaban after being executed. If a flow runs longer than this, it will be killed. If smaller or equal to 0, there's no restriction on running time. | -1 |
MySQL Connection Parameter
| Parameter | Description | Default |
|---|---|---|
database.type |
The database type. Currently, the only database supported is mysql. | mysql |
mysql.port |
The port to the mysql db | 3306 |
mysql.host |
The mysql host | localhost |
mysql.database |
The mysql database | |
mysql.user |
The mysql user | |
mysql.password |
The mysql password | |
mysql.numconnections |
The number of connections that Azkaban web client can open to the database | 100 |
Plugin Configurations
Execute-As-User
With a new security enhancement in Azkaban 3.0, Azkaban jobs can now run as the submit user or the user.to.proxy of the flow by default. This ensures that Azkaban takes advantage of the Linux permission security mechanism, and operationally this simplifies resource monitoring and visibility. Set up this behavior by doing the following:-
- Execute.as.user is set to true by default. In case needed, it can also be configured to false in azkaban-plugin’s commonprivate.properties
- Configure azkaban.native.lib= to the place where you are going to put the compiled execute-as-user.c file (see below)
- Generate an executable on the Azkaban box for azkaban-common/src/main/c/execute-as-user.c. it should be named execute-as-user Below is a sample approach
scp ./azkaban-common/src/main/c/execute-as-user.conto the Azkaban box- run:
gcc execute-as-user.c -o execute-as-user - run:
chown root execute-as-user (you might need root privilege) - run:
chmod 6050 execute-as-user (you might need root privilege)
UserManager
When you start Azkaban, you may notice the login page. Azkaban makes you authenticate before you can use it. This is prevent seeing or executing workflows you shoudn't see or touch.
We also used authenticated users for auditing purposes. Whenever project files change, is modified, scheduled, etc. we often want to know which user performed that action.

XmlUserManager
The XmlUserManager is the default UserManager that is built into Azkaban. To explicitly set the parameters that configure the XmlUserManager, the following parameters can be set in the azkaban.properties file.
| Parameter | Default |
|---|---|
| user.manager.class | azkaban.user.XmlUserManager |
| user.manager.xml.file | azkaban-users.xml |
The other file that needs to be modified is the azkaban-users.xml file. The XmlUserManager will parse the user xml file once during startup to set up the users.
Everything must be enclosed in a <azkaban-users> tag.
<azkaban-users>
	...
</azkaban-users>
Users
To add users, add the <user> tag.
<azkaban-users>
  <user username="myusername" password="mypassword" roles="a" groups="mygroup" / >
  <user username="myusername2" password="mypassword2" roles="a, b" groups="ga, gb" / >
  ...
</azkaban-users>
| Attributes | Values | Required? |
|---|---|---|
| username | The login username. | yes |
| password | The login password. | yes |
| roles | Comma delimited list of roles that this user has. | no |
| groups | Comma delimited list of groups that the users belongs to. | no |
| proxy | Comma delimited list of proxy users that this users can give to a project | no |
Groups
To define each group, you can add the <group> tag.
<azkaban-users>
  <user username="a" ... groups="groupa" / >
  ...
  <group name="groupa" roles="myrole" / >
  ...
</azkaban-users>
In the previous example, user 'a' is in the group 'groupa'. User 'a' would also have the 'myrole' role. A regular user cannot add group permissions to a project unless they are members of that group.
The following are some group attributes that you can assign.
| Attributes | Values | Required? |
|---|---|---|
| name | The group name | yes |
| roles | Comma delimited list of roles that this user has. | no |
Roles
Roles are different in that it assigns global permissions to users in Azkaban. You can set up roles with the <roles> tag.
<azkaban-users>
  <user username="a" ... groups="groupa" roles="readall" / >
  <user username="b" ... / >
  ...
  <group name="groupa" roles="admin" / >
  ...
  <role name="admin" permissions="ADMIN" / >
  <role name="readall" permissions="READ" / >
</azkaban-users>
In the above example, user 'a' has the role 'readall', which is defined as having the READ permission. This means that user 'a' has global READ access on all the projects and executions.
User 'a' also is in 'groupa', which has the role ADMIN. It's certainly redundant, but user 'a' is also granted the ADMIN role on all projects.
The following are some group attributes that you can assign.
| Attributes | Values | Required? |
|---|---|---|
| name | The group name | yes |
| permissions | Comma delimited list global permissions for the role | yes |
The possible role permissions are the following:
| Permissions | Values |
|---|---|
| ADMIN | Grants all access to everything in Azkaban. |
| READ | Gives users read only access to every project and their logs |
| WRITE | Allows users to upload files, change job properties or remove any project |
| EXECUTE | Allows users to trigger the execution of any flow |
| SCHEDULE | Users can add or remove schedules for any flows |
| CREATEPROJECTS | Allows users to create new projects if project creation is locked down |
Custom User Manager
Although the XmlUserManager is easy enough to get started with, you may want to integrate with an already established directory system, such as LDAP.
It should be fairly straight forward to implement a custom UserManager. The UserManager is a java interface. There are only a few methods needed to implement.
public interface UserManager {
	public User getUser(String username, String password) throws UserManagerException;
	public boolean validateUser(String username);
	public boolean validateGroup(String group);
	public Role getRole(String roleName);
	public boolean validateProxyUser(String proxyUser, User realUser);
}
The constructor should take an azkaban.utils.Props object. The contents of azkaban.properties will be available for the UserManager for configuration.
Package your new custom UserManager into a jar and drop it into the ./extlib directory or alternatively into the plugins directory (i.e. ./plugins/ldap/linkedin-ldap.jar).
Change the azkaban.properties configuration to point to the custom UserManager. Add additional parameters into azkaban.properties if needed by your custom user manager.
| Parameter | Default |
|---|---|
user.manager.class |
azkaban.user.CustomUserManager |
创建流程
作业是你想在Azkaban运行的过程。作业可以设置为依赖于其他作业。由一组作业及其依赖关系创建的图形构成了一个流程。
创建作业
创建作业非常简单。我们创建一个.job扩展属性文件。此作业文件定义了要运行的作业类型,依赖性以及正确设置作业所需的任何参数。
# foo.job
type=command
command=echo "Hello World"
在这个例子中,作业的type是command。该command参数是command类型作业可以理解的参数。在这种情况下,它将运行命令来打印“Hello World”。将标准输出和作业的标准错误写入日志,日志可在Azkaban Web UI中查看。
有关作业的更多信息,请参阅作业配置 页面。
创建流程
流程是一组相互依赖的作业。作业的依赖始终在作业本身运行之前运行。要向作业中添加依赖项dependencies,请按以下示例中所示来添加该属性。
# foo.job
type=command
command=echo foo
# bar.job
type=command
dependencies=foo
command=echo bar
该dependencies参数采用逗号分隔的作业名称列表。确保作业名称存在,并且没有循环依赖。
为每个没有作业依赖的作业创建一个流程,并为作业流程赋予相同的名称。例如,在上面的例子中,bar依赖于foo,但没有任何依赖bar。因此将会创建一个名称为bar流程。
嵌入式流程
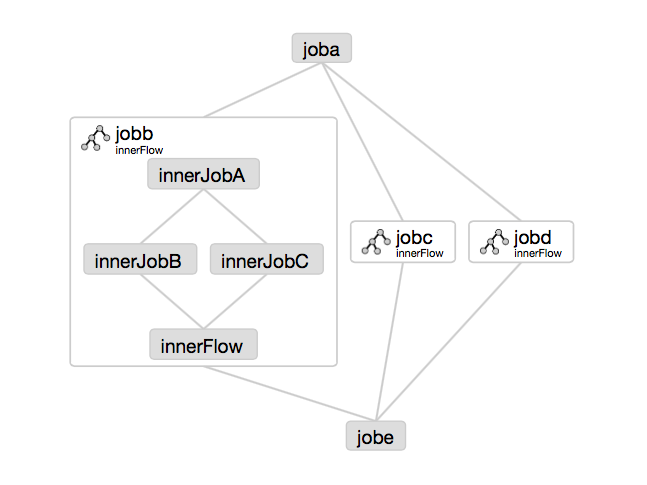
流程也以嵌入式流程形式作为其他流程中的节点,被包含进其他流程中。要创建嵌入式流程,只需创建一个.job文件,其type=flow并将其flow.name设置为流程名称。例如:
# baz.job
type=flow
flow.name=bar
同样可以,通过给每个嵌入式流程的.job文件添加参数,实现不同设置,一起被嵌入到其他流程中。
上传流程
要上传流程,只需要将.job和所有需要执行的二进制文件存档到一个.zip文件中。通过Azkaban UI,您就可以部署您的作业流程。该流程将针对缺失或循环依赖性进行验证。查看项目上传。
Job Configurations
Common Parameters
Besides the type and the dependencies parameters, there are several parameters that Azkaban reserves for all jobs. All of the parameters below are optional.
| Parameter | Description |
|---|---|
| retries | The number of retries that will be automatically attempted for failed jobs |
| retry.backoff | The millisec time between each retry attempt |
| working.dir | Override the working directory for the execution. This is by default the directory that contains the job file that is being run. |
| env.property | Set the environment variable with named property |
| failure.emails | Comma delimited list of emails to notify during a failure. * |
| success.emails | Comma delimited list of emails to notify during a success. * |
| notify.emails | Comma delimited list of emails to notify during either a success or failure. * |
Email properties
Note that for email properties, this property is retrieved from the last job in the flow and applied flow level. All other email properties of jobs in the flow are ignored.
Runtime Properties
These properties are automatically added to Azkaban properties during runtime for a job to use.
| Parameter | Description |
|---|---|
| azkaban.job.attempt | The attempt number for the job. Starts with attempt 0 and increments with every retry. |
| azkaban.job.id | The job name. |
| azkaban.flow.flowid | The flow name that the job is running in. |
| azkaban.flow.execid | The execution id that is assigned to the running flow. |
| azkaban.flow.projectid | The numerical project id. |
| azkaban.flow.projectversion | The project upload version. |
| azkaban.flow.uuid | A unique identifier assigned to a flow’s execution. |
| azkaban.flow.start.timestamp | The millisecs since epoch start time. |
| azkaban.flow.start.year | The start year. |
| azkaban.flow.start.month | The start month of the year (1-12) |
| azkaban.flow.start.day | The start day of the month. |
| azkaban.flow.start.hour | The start hour in the day. |
| azkaban.flow.start.minute | The start minute. |
| azkaban.flow.start.second | The start second in the minute. |
| azkaban.flow.start.milliseconds | The start millisec in the sec |
| azkaban.flow.start.timezone | The start timezone that is set. |
Inherited Parameters
Any included .properties files will be treated as properties that are shared amongst the individual jobs of the flow. The properties are resolved in a hierarchical manner by directory.
For instance, suppose you have the following directory structure in your zip file.
system.properties
baz.job
myflow/
   myflow.properties
   myflow2.properties
   foo.job
   bar.job
That directory structure will be preserved when running in Azkaban. The baz job will inherit only from system.properties. The jobs foo and bar will inherit from myflow.properties and myflow2.properties, which in turn will inherit from system.properties.
The hierarchical ordering of properties in the same directory is arbitrary.
Parameter Substitution
Azkaban allows for replacing of parameters. Whenever a ${parameter} is found in a properties or job file, Azkaban will attempt to replace that parameter. The resolution of the parameters is done late.
# shared.properties
replaceparameter=bar
# myjob.job
param1=mytest
foo=${replaceparameter}

param2=${param1}
In the previous example, before myjob is run, foo will equal bar and param2 will equal mytest.
A parameter cannot contain spaces. Following invalid.job is an example of incorrect parameter name.
# invalid.job
type=command
command=${wh oa mi}
command.1=${whoami }
Parameter Passing
There is often a desire to pass these parameters to the executing job code. The method of passing these parameters is dependent on the jobtype that is run, but usually Azkaban writes these parameters to a temporary file that is readable by the job.
The path of the file is set in JOB_PROP_FILE environment variable. The format is the same key value pair property files. Certain built-in job types do this automatically for you. The java type, for instance, will invoke your Runnable and given a proper constructor, Azkaban can pass parameters to your code automatically.
Parameter Output
Properties can be exported to be passed to its dependencies. A second environment variable JOB_OUTPUT_PROP_FILE is set by Azkaban. If a job writes a file to that path, Azkaban will read this file and then pass the output to the next jobs in the flow.
The output file should be in json format. Certain built-in job types can handle this automatically, such as the java type.
Built-in Job types
Azkaban allows custom job types to be added as plugins. However it also supplies several built-in job types. On top of the job parameters that can be set, each job type has additional properties that can be used.
Command
Command type of job can be set with type=command. It is a barebones command line executor. Many of the other job types wrap the _command_ job type but constructs their own command lines.
| Parameter | Description | Required? |
|---|---|---|
| command | The command line string to execute. i.e. ls -lh |
yes |
| command. n | Where n is a sequence of integers (i.e 1,2,3…). Defines additional commands that run in sequential order after the initial command. | no |
Java Process
Java process jobs are a convenient wrapper for kicking off Java-based programs. It is equivalent to running a class with a main method from the command line. The following properties are available in javaprocess jobs:
| Parameter | Description | Required? |
|---|---|---|
| java.class | The class that contains the main function. i.e azkaban.example.text.HelloWorld |
yes |
| classpath | Comma delimited list of jars and directories to be added to the classpath. Default is all jars in the current working directory. | no |
| Xms | The initial memory pool start size. The default is 64M | no |
| Xmx | The initial maximum memory pool size. The default is 256M | no |
| main.args | A list of comma delimited arguments to pass to the java main function | no |
| jvm.args | JVM args. This entire string is passed intact as a VM argument. -Dmyprop=test -Dhello=world |
no |
Noop
A job that takes no parameters and is essentially a null operation. Used for organizing your graph.
使用Azkaban
本节介绍如何使用Azkaban Web UI创建,查看和执行您的流程。
创建项目
登录Azkaban后,您将看到Projects页面。此页面将显示您拥有读取权限的所有项目的列表。其中只有组权限的项目或具有READ或ADMIN角色的项目不会出现。

如果您刚刚开始,则项目页面可能为空。但是,您可以通过单击All Projects来查看所有现有项目。
点击Create Projects将弹出一个对话框。输入唯一的项目名称和项目描述。说明可以在将来更改,但项目名称不能。如果您没有看到此按钮,则除了具有适当权限的用户之外,创建新项目的功能可能已锁定。

创建项目后,会出现一个空白的项目页面。您将自动获得该项目的ADMIN状态。通过单击Permissions按钮添加和删除权限。

如果您拥有适当的权限(如果创建项目,您应该使用该权限),则可以从此页面删除项目,更新说明,上载文件和查看项目日志。
上传项目
点击Upload按钮。你会看到下面的对话框。

选择您想要上传的工作流文件的存档文件。目前Azkaban只支持*.zip文件。该zip文件应该包含*.job文件以及运行作业所需的任何文件。作业名称在项目中必须是唯一的。
Azkaban将验证压缩文件的内容以确保符合依赖性,并且没有检测到循环依赖。如果发现任何无效流程,上传将失败。
上传会覆盖项目中的所有文件。上传新的zip文件后,对作业所做的任何更改都将被清除。
成功上传后,您应该可以看到屏幕上列出的所有流程。
流程视图
通过点击流程链接,您可以进入流程视图页面。从这里开始,您将看到流程的图形表示。左侧面板包含流程中的作业列表。
右键单击右侧面板中的作业或图形中的节点将允许您打开单个作业。您也可以在此页面Schedule和Execute流程。

点击Executions选项卡将显示此流程的所有先前执行情况。

项目权限
创建项目时,创建者将自动获得项目的ADMIN权限状态。这允许创建者查看,上传,更改作业,运行流程,删除和向项目添加用户权限。管理员可以删除其他管理员,但不能删除自己。这样可以防止当管理员全被具有管理员角色的用户删除后,项目不受管理。
权限页面可从项目页面访问。在权限页面上,管理员可以将其他用户,组或代理用户添加到项目中。

- 添加用户权限为这些用户提供了项目的指定权限。通过取消选中所有权限来删除用户权限。
- 组权限允许特定组中的每个人都拥有指定的权限。通过取消选中所有组权限来删除组权限。
- 如果启用代理用户,代理用户允许项目工作流程以这些用户身份运行。这对于锁定哪些无头帐号作业可以代理来说很有用。一旦添加,点击“删除”按钮即可删除它们。
每个用户都通过UserManager进行验证,以防止添加无效用户。组和代理用户也进行检查以确保它们是有效的,并查看是否允许管理员将它们添加到项目中
可以为用户和组设置以下权限:
| 权限 | 描述 |
|---|---|
| ADMIN | 允许用户对此项目执行任何操作,并添加权限并删除项目 |
| READ | 用户可以查看作业,流程和执行日志。 |
| WRITE | 项目文件可以上传,作业文件可以修改。 |
| EXECUTE | 用户被允许执行,暂停,取消作业。 |
| SCHEDULE | 用户可以添加,修改和删除日程表中的流程。 |
执行流程
从流程视图或项目页面中,您可以触发要执行的作业。您将看到一个正在执行的面板弹出窗口。执行流程视图
在“流程视图”面板中,可以右键单击图并禁用或启用作业。在执行期间,被禁用的作业将被跳过,就好像它们的依赖关系已被满足一样。被禁用的作业将呈现半透明状态。
Notification Options
The notification options allow users to change the flow's success or failure notification behavior.
Notify on Failure
- First Failure - Send failure emails after the first failure is detected.
- Flow Finished - If the flow has a job that has failed, it will send failure emails after all jobs in the flow have finished.
Email overrides
Azkaban will use the default notification emails set in the final job in the flow. If overridden, a user can change the email addresses where failure or success emails are sent. The list can be delimited by commas, whitespace or a semi-colon.

Failure Options
When a job in a flow fails, you are able to control how the rest of the flow will succeed.
- Finish Current Running will finish the jobs that are currently running, but it will not start new jobs. The flow will be put in the
FAILED FINISHINGstate and be set to FAILED once everything completes. - Cancel All will immediately kill all running jobs and set the state of the executing flow to FAILED.
- Finish All Possible will keep executing jobs in the flow as long as its dependencies are met. The flow will be put in the
FAILED FINISHINGstate and be set to FAILED once everything completes.

Concurrent Options
If the flow execution is invoked while the flow is concurrently executing, several options can be set.
- Skip Execution option will not run the flow if its already running.
- Run Concurrently option will run the flow regardless of if its running. Executions are given different working directories.
-
Pipeline runs the the flow in a manner that the new execution will not overrun the concurrent execution.
- Level 1: blocks executing job A until the the previous flow's job A has completed.
- Level 2: blocks executing job A until the the children of the previous flow's job A has completed. This is useful if you need to run your flows a few steps behind an already executin flow.

Flow Parameters
Allows users to override flow parameters. The flow parameters override the global properties for a job, but not the properties of the job itself.

Executions
Flow Execution Page
After executing a flow you will be presented the Executing Flow page. Alternatively, you can access these flows from the Flow View page under the Executions tab, the History page, or the Executing page.
This page is similar to the Flow View page, except it shows status of running jobs.

Selecting the Job List will give a timeline of job executions. You can access the jobs and job logs directly from this list.

This page will auto update as long as the execution is not finished.
Some options that you are able to do on execution flows include the following:
- Cancel - kills all running jobs and fails the flow immediately. The flow state will be KILLED.
- Pause - prevents new jobs from running. Currently running jobs proceed as usual.
- Resume - resume a paused execution.
- Retry Failed - only available when the flow is in a FAILED FINISHING state. Retry will restart all FAILED jobs while the flow is still active. Attempts will appear in the Jobs List page.
- Prepare Execution - only available on a finished flow, regardless of success or failures. This will auto disable successfully completed jobs.
Executing Page
Clicking on the Executing Tab in the header will show the Execution page. This page will show currently running executions as well as recently finished flows.

History Page
Currently executing flows as well as completed executions will appear in the History page. Searching options are provided to find the execution you're looking for. Alternatively, you can view previous executions for a flow on the Flow View execution tab.

Schedule Flow
From the same panel that is used to execute flows, flows can be scheduled by clicking on the *Schedule* button.

Any flow options set will be preserved for the scheduled flow. For instance, if jobs are disabled, then the scheduled flow's jobs will also be disabled.
With new flexible scheduling feature in Azkaban 3.3, User are able to define a cron job following Quartz syntax. One important change different from Quartz or cron is that Azkaban functions at the minute granularity at most. Therefore, second field in UI is labeled as a static "0". The Flexible Schedule Wiki explains the details how to use.
After scheduling, it should appear on the schedule page, where you can remove the scheduled job or set the SLA options.

SLA
To add SLA notification or pre-emption, click on the SLA button. From here you can set the SLA alert emails. Rules can be added and applied to individual jobs or the flow itself. If duration threshold is exceeded, then an alert email can be set or the flow or job can be auto killed. If a job is killed due to missing the SLA, it will be retried based on the retry configuration of that job.

Job Page
Jobs make up individual tasks of a flow. To get to the jobs page, you can right click on a job in the Flow View, the Executing Flow view or the Project Page.

From this page you can see the dependencies and dependents for a job as well as the global properties that the job will use.
Job Edit
Clicking on Job Edit will allow you to edit all the job properties except for certain reserved parameters, such as type, and dependencies. The changes to the parameters will affect an executing flow only if the job hasn't started to run yet. These overwrites of job properties will be overwritten by the next project upload.

Job History
Any retries of a job will show as executionid.attempt number.

Job Details
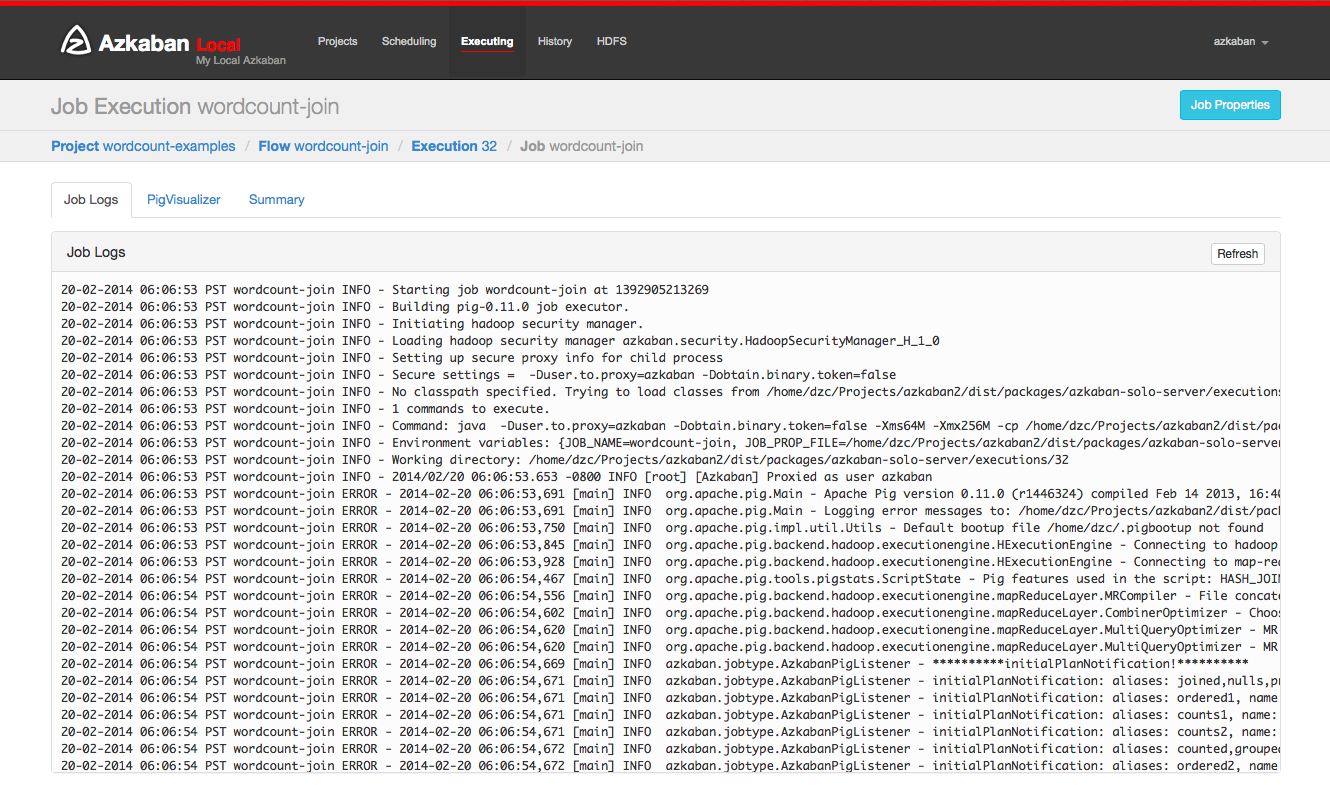
From an execution page, after clicking "Job List" and then "Details" for one of the jobs, you will arrive at the job details page. This page contains tabs for the "Job Logs" and a "Summary".
Job Logs
The job logs are stored in the database. They contain all the stdout and stderr output of the job.
Job Summary
The Job Summary tab contains a summary of the information in the job logs. This includes:- Job Type - the jobtype of the job
- Command Summary - the command that launched the job process, with fields such as the classpath and memory settings shown separately as well
- Pig/Hive Job Summary - custom stats specific to Pig and Hive jobs
- Map Reduce Jobs - a list of job ids of Map-Reduce jobs that were launched, linked to their job tracker pages

AJAX API
Often there's a desire to interact with Azkaban without having to use the web UI. Azkaban has some exposed ajax calls accessible through curl or some other HTTP request clients. All API calls require a proper authentication first.
Azkaban assumes the following request header in servlet's isAjaxCall(HttpServletRequest request) method:
  Content-Type:     application/x-www-form-urlencoded
  X-Requested-With: XMLHttpRequest
However, currently for most of APIs in this version, it is not checking the request header. Many APIs still treat a request as an ajax call if
request simply contains the parameter ajax. Or even, several APIs is implicitly assuming it is an ajax call even without this keyword. For ease of use though, it is recommended to always keep the correct request header.
Authenticate
- Method: POST
- Request URL: /?action=login
- Parameter Location: Request Query String
This API helps authenticate a user and provides a session.id in response.
Once a session.id has been returned, until the session expires, this id can be used to do any API requests with a proper permission granted. A session expires if you log out, change machines, browsers or locations, if Azkaban is restarted, or if the session expires. The default session timeout is 24 hours (one day). You can re-login whether the session has expired or not. For the same user, a new session will always override old one.
Importantly, session.id should be provided for almost all API calls (other than authentication). session.id can be simply appended as one of the request parameters, or set via the cookie: azkaban.browser.session.id. The two HTTP requests below are equivalent:
# a) Provide session.id parameter directly
curl -k --get --data "session.id=bca1d75d-6bae-4163-a5b0-378a7d7b5a91&ajax=fetchflowgraph&project=azkaban-test-project&flow=test" https://localhost:8443/manager

# b) Provide azkaban.browser.session.id cookie
curl -k --get -b "azkaban.browser.session.id=bca1d75d-6bae-4163-a5b0-378a7d7b5a91" --data "ajax=fetchflowgraph&project=azkaban-test-project&flow=test" https://localhost:8443/manager
Request Parameters
| Parameter | Description |
|---|---|
| action=login | The fixed parameter indicating the login action. |
| username | The Azkaban username. |
| password | The corresponding password. |
Response Object
| Parameter | Description |
|---|---|
| error | Return an error message if the login attempt fails. |
| session.id | Return a session id if the login attempt succeeds. |
curl -k -X POST --data "action=login&username=azkaban&password=azkaban" https://localhost:8443A sample response:
{
  "status" : "success",
  "session.id" : "c001aba5-a90f-4daf-8f11-62330d034c0a"
}
Create a Project
The ajax API for creating a new project.
Notice:
before uploading any project zip files, the project should be created first via this API.
- Method: POST
- Request URL: /manager?action=create
- Parameter Location: Request Query
Request Parameters
| Parameter | Description |
|---|---|
| session.id | The user session id. |
| action=create | The fixed parameter indicating the create project action. |
| name | The project name to be uploaded. |
| description | The description for the project. This field cannot be empty. |
Response Object 1. (if the request succeeds):
| Parameter | Description |
|---|---|
| status | The status of the creation attempt. |
| path | The url path to redirect |
| action | The action that is suggested for the frontend to execute. (This is designed for the usage of the Azkaban frontend javascripts, external users can ignore this field.) |
Response Object 2. (if the request fails):
| Parameter | Description |
|---|---|
| message | The error message. |
| error | The error name. |
Here's a curl command sample:
curl -k -X POST --data "session.id=9089beb2-576d-47e3-b040-86dbdc7f523e&name=aaaa&description=11" https://localhost:8443/manager?action=createA sample response:
{
  "status":"success",
  "path":"manager?project=aaaa",
  "action":"redirect"
}
Delete a Project
The ajax API for deleting an existing project.
Notice:
Currently no response message will be returned after finishing the delete operation.
- Method: GET
- Request URL: /manager?delete=true
- Parameter Location: Request Query
Request Parameters
| Parameter | Description |
|---|---|
| session.id | The user session id. |
| delete=true | The fixed parameter to indicate the deleting project action. |
| project | The project name to be deleted. |
Here's a curl command sample:
curl -k --get --data "session.id=bca1d75d-6bae-4163-a5b0-378a7d7b5a91&delete=true&project=test-delete-project" https://localhost:8443/manager
Upload a Project Zip
The ajax call to upload a project zip file. The zip file structure should follows the requirements described in
Upload Projects .
Notice: This API should be called after a project is successfully created.
- Method: POST
- Content-Type: multipart/mixed
- Request URL: /manager?ajax=upload
- Parameter Location: Request Body
Request Parameters
| Parameter | Description |
|---|---|
| session.id | The user session id. |
| ajax=upload | The fixed parameter to the upload action. |
| project | The project name to be uploaded. |
| file | The project zip file. The type should be set as application/zip or application/x-zip-compressed. |
Response Object
| Parameter | Description |
|---|---|
| error | The error message if the upload attempt fails. |
| projectId | The numerical id of the project |
| version | The version number of the upload |
Here's a curl command sample:
curl -k -i -H "Content-Type: multipart/mixed" -X POST --form 'session.id=e7a29776-5783-49d7-afa0-b0e688096b5e' --form 'ajax=upload' --form 'file=@myproject.zip;type=application/zip' --form 'project=MyProject;type/plain' https://localhost:8443/managerA response sample:
{
  "error" : "Installation Failed.\nError unzipping file.",
  "projectId" : "192",
  "version" : "1"
}
Fetch Flows of a Project
Given a project name, this API call fetches all flow ids of that project.
- Method: GET
- Request URL: /manager?ajax=fetchprojectflows
- Parameter Location: Request Query String
Request Parameters
| Parameter | Description |
|---|---|
| session.id | The user session id. |
| ajax=fetchprojectflows | The fixed parameter indicating the fetchProjectFlows action. |
| project | The project name to be fetched. |
Response Object
| Parameter | Description |
|---|---|
| project | The project name. |
| projectId | The numerical id of the project. |
| flows |
A list of flow ids.
Example values: [{"flowId": "aaa"}, {"flowId": "bbb"}] |
Here's a curl command sample:
curl -k --get --data "session.id=6c96e7d8-4df5-470d-88fe-259392c09eea&ajax=fetchprojectflows&project=azkaban-test-project" https://localhost:8443/managerA response sample:
{
  "project" : "test-azkaban",
  "projectId" : 192,
  "flows" : [ {
    "flowId" : "test"
  }, {
    "flowId" : "test2"
  } ]
}
Fetch Jobs of a Flow
For a given project and a flow id, this API call fetches all the jobs that belong to this flow. It also returns the corresponding graph structure of those jobs.
- Method: GET
- Request URL: /manager?ajax=fetchflowgraph
- Parameter Location: Request Query String
Request Parameters
| Parameter | Description |
|---|---|
| session.id | The user session id. |
| ajax=fetchflowgraph | The fixed parameter indicating the fetchProjectFlows action. |
| project | The project name to be fetched. |
| flow | The project id to be fetched. |
Response Object
| Parameter | Description |
|---|---|
| project | The project name. |
| projectId | The numerical id of the project. |
| flow | The flow id fetched. |
| nodes |
A list of job nodes belonging to this flow.
Structure:
{
  "id": "job.id"
  "type": "job.type"
  "in": ["job.ids that this job is directly depending upon.
  Indirect ancestors is not included in this list"]
}
Example values: [{"id": "first_job", "type": "java"}, {"id": "second_job", "type": "command", "in":["first_job"]}] |
Here's a curl command sample:
curl -k --get --data "session.id=bca1d75d-6bae-4163-a5b0-378a7d7b5a91&ajax=fetchflowgraph&project=texter-1-1&flow=test" https://localhost:8445/managerA response sample:
{
  "project" : "azkaban-test-project",
  "nodes" : [ {
    "id" : "test-final",
    "type" : "command",
    "in" : [ "test-job-3" ]
  }, {
    "id" : "test-job-start",
    "type" : "java"
  }, {
    "id" : "test-job-3",
    "type" : "java",
    "in" : [ "test-job-2" ]
  }, {
    "id" : "test-job-2",
    "type" : "java",
    "in" : [ "test-job-start" ]
  } ],
  "flow" : "test",
  "projectId" : 192
}
Fetch Executions of a Flow
Given a project name, and a certain flow, this API call provides a list of corresponding executions. Those executions are sorted in descendent submit time order. Also parameters are expected to specify the start index and the length of the list. This is originally used to handle pagination.- Method: GET
- Request URL: /manager?ajax=fetchFlowExecutions
- Parameter Location: Request Query String
Request Parameters
| Parameter | Description |
|---|---|
| session.id | The user session id. |
| ajax=fetchFlowExecutions | The fixed parameter indicating the fetchFlowExecutions action. |
| project | The project name to be fetched. |
| flow | The flow id to be fetched. |
| start | The start index(inclusive) of the returned list. |
| length | The max length of the returned list. For example, if the start index is 2, and the length is 10, then the returned list will include executions of indices: [2, 3, 4, 5, 6, 7, 8, 9, 10, 11]. |
Response Object
| Parameter | Description |
|---|---|
| executions | A list of execution objects, with the resquested start index and length. |
| total | The total number of all relevant execution |
| project | The project name fetched. |
| projectId | The numerical project id fetched. |
| flow | The flow id fetched. |
| from | The start index of the fetched executions |
| length | The length of the fetched executions. |
Here's a curl command sample:
curl -k --get --data "session.id=6c96e7d8-4df5-470d-88fe-259392c09eea&ajax=fetchFlowExecutions&project=azkaban-test-project&flow=test&start=0&length=3" https://localhost:8443/managerA response sample:
{
  "executions" : [ {
    "startTime" : 1407779928865,
    "submitUser" : "1",
    "status" : "FAILED",
    "submitTime" : 1407779928829,
    "execId" : 306,
    "projectId" : 192,
    "endTime" : 1407779950602,
    "flowId" : "test"
  }, {
    "startTime" : 1407779877807,
    "submitUser" : "1",
    "status" : "FAILED",
    "submitTime" : 1407779877779,
    "execId" : 305,
    "projectId" : 192,
    "endTime" : 1407779899599,
    "flowId" : "test"
  }, {
    "startTime" : 1407779473354,
    "submitUser" : "1",
    "status" : "FAILED",
    "submitTime" : 1407779473318,
    "execId" : 304,
    "projectId" : 192,
    "endTime" : 1407779495093,
    "flowId" : "test"
  } ],
  "total" : 16,
  "project" : "azkaban-test-project",
  "length" : 3,
  "from" : 0,
  "flow" : "test",
  "projectId" : 192
}
Fetch Running Executions of a Flow
Given a project name and a flow id, this API call fetches only executions that are currently running.
- Method: GET
- Request URL: /executor?ajax=getRunning
- Parameter Location: Request Query String
Request Parameters
| Parameter | Description |
|---|---|
| session.id | The user session id. |
| ajax=getRunning | The fixed parameter indicating the getRunning action. |
| project | The project name to be fetched. |
| flow | The flow id to be fetched. |
Response Object
| Parameter | Description |
|---|---|
| execIds | A list of execution ids fetched.
Example values: [301, 302, 111, 999] |
Here's a curl command sample:
curl -k --data "session.id=34ba08fd-5cfa-4b65-94c4-9117aee48dda&ajax=getRunning&project=azkaban-test-project&flow=test" https://localhost:8443/executorA response sample:
{
  "execIds": [301, 302]
}
Execute a Flow
This API executes a flow via an ajax call, supporting a rich selection of different options. Running an individual job can also be achieved via this API by disabling all other jobs in the same flow.
- Method: GET
- Request URL: /executor?ajax=executeFlow
- Parameter Location: Request Query String
Request Parameters
| Parameter | Description |
|---|---|
| session.id |
The user session id. Example Values: 30d538e2-4794-4e7e-8a35-25a9e2fd5300 |
| ajax=executeFlow |
The fixed parameter indicating the current ajax action is executeFlow. |
| project |
The project name of the executing flow. Example Values: run-all-jobs |
| flow |
The flow id to be executed. Example Values: test-flow |
| disabled (optional) |
A list of job names that should be disabled for this execution. Should be formatted as a JSON Array String. Example Values: ["job_name_1", "job_name_2", "job_name_N"] |
| successEmails (optional) |
A list of emails to be notified if the execution succeeds. All emails are delimitted with [,|;|\\s+]. Example Values: foo@email.com,bar@email.com |
| failureEmails (optional) |
A list of emails to be notified if the execution fails. All emails are delimitted with [,|;|\\s+]. Example Values: foo@email.com,bar@email.com |
| successEmailsOverride (optional) |
Whether uses system default email settings to override successEmails. Possible Values: true, false |
| failureEmailsOverride (optional) |
Whether uses system default email settings to override failureEmails. Possible Values: true, false |
| notifyFailureFirst (optional) |
Whether sends out email notifications as long as the first failure occurs. Possible Values: true, false |
| notifyFailureLast (optional) |
Whether sends out email notifications as long as the last failure occurs. Possible Values: true, false |
| failureAction (Optional) |
If a failure occurs, how should the execution behaves. Possible Values: finishCurrent, cancelImmediately, finishPossible |
| concurrentOption (Optional) |
Concurrent choices. Use ignore if nothing specifical is required. Possible Values: ignore, pipeline, skip |
| flowOverride[flowProperty] (Optional) |
Override specified flow property with specified value. Example Values : flowOverride[failure.email]=test@gmail.com |
Response Object
| Parameter | Description |
|---|---|
| error | Error message if the call has failed |
| flow | The executed flow id |
| execid | The execution id |
curl -k --get --data 'session.id=189b956b-f39f-421e-9a95-e3117e7543c9' --data 'ajax=executeFlow' --data 'project=azkaban-test-project' --data 'flow=test' https://localhost:8443/executorSample response:
{
  message: "Execution submitted successfully with exec id 295",
  project: "foo-demo",
  flow: "test",
  execid: 295
}
Cancel a Flow Execution
Given an execution id, this API call cancels a running flow. If the flow is not running, it will return an error message.
- Method: GET
- Request URL: /executor?ajax=cancelFlow
- Parameter Location: Request Query String
Request Parameters
| Parameter | Description |
|---|---|
| session.id |
The user session id. |
| ajax=cancelFlow |
The fixed parameter indicating the current ajax action is cancelFlow. |
| execid |
The execution id. |
Here's a curl command sample:
curl -k --data "session.id=34ba08fd-5cfa-4b65-94c4-9117aee48dda&ajax=cancelFlow&execid=302" https://localhost:8443/executorA response sample if succeeds:
{ }
A response sample if fails:
{
  "error" : "Execution 302 of flow test isn't running."
}
Schedule a period-based Flow (Deprecated)
This API call schedules a period-based flow.
- Method: POST
- Request URL: /schedule?ajax=scheduleFlow
- Parameter Location: Request Query String
Request Parameters
| Parameter | Description | ||||||||||||
|---|---|---|---|---|---|---|---|---|---|---|---|---|---|
| session.id | The user session id. | ||||||||||||
| ajax=scheduleFlow | The fixed parameter indicating the action is to schedule a flow. | ||||||||||||
| projectName | The name of the project. | ||||||||||||
| projectId | The id of the project. You can find this with Fetch Flows of a Project. | ||||||||||||
| flowName | The name of the flow. | ||||||||||||
| scheduleTime(with timezone) | The time to schedule the flow. Example: 12,00,pm,PDT (Unless UTC is specified, Azkaban will take current server's default timezone instead) | ||||||||||||
| scheduleDate | The date to schedule the flow. Example: 07/22/2014 | ||||||||||||
| is_recurring=on (optional) | Flags the schedule as a recurring schedule. | ||||||||||||
| period (optional) | Specifies the recursion period. Depends on the "is_recurring" flag being set. Example: 5w
Possible Values:
|
Here's a curl command sample:
  # a) One time schedule
  curl -k https://HOST:PORT/schedule -d "ajax=scheduleFlow&projectName=PROJECT_NAME&flow=FLOW_NAME&projectId=PROJECT_ID&scheduleTime=12,00,pm,PDT&scheduleDate=07/22/2014" -b azkaban.browser.session.id=SESSION_ID

  # b) Recurring schedule
  curl -k https://HOST:PORT/schedule -d "ajax=scheduleFlow&is_recurring=on&period=5w&projectName=PROJECT_NAME&flow=FLOW_NAME&projectId=PROJECT_ID&scheduleTime=12,00,pm,PDT&scheduleDate=07/22/2014" -b azkaban.browser.session.id=SESSION_ID
An example success response:
{
  "message" : "PROJECT_NAME.FLOW_NAME scheduled.",
  "status" : "success"
}
An example failure response:
{
  "message" : "Permission denied. Cannot execute FLOW_NAME",
  "status" : "error"
}
An example failure response for invalid schedule period:
{
  "message" : "PROJECT_NAME.FLOW_NAME scheduled.",
  "error" : "Invalid schedule period unit 'A",
  "status" : "success"
}
Flexible scheduling using Cron
This API call schedules a flow by a cron Expression. Cron is a UNIX tool that has been widely used for a long time, and we use Quartz library to parse cron Expression. All cron schedules follow the timezone defined in azkaban web server (the timezone ID is obtained by java.util.TimeZone.getDefault().getID()).
- Method: POST
- Request URL: /schedule?ajax=scheduleCronFlow
- Parameter Location: Request Query String
Request Parameters
| Parameter | Description |
|---|---|
| session.id | The user session id. |
| ajax=scheduleCronFlow | The fixed parameter indicating the action is to use cron to schedule a flow. |
| projectName | The name of the project. |
| flow | The name of the flow. |
| cronExpression | A CRON expression is a string comprising 6 or 7 fields separated by white space that represents a set of times. In azkaban, we use Quartz Cron Format. |
Here's a curl command sample:
curl -k -d ajax=scheduleCronFlow -d projectName=wtwt -d flow=azkaban-training --data-urlencode cronExpression="0 23/30 5,7-10 ? * 6#3" -b "azkaban.browser.session.id=XXXXXXXXXXXXXX" http://localhost:8081/scheduleAn example success response:
{
  "message" : "PROJECT_NAME.FLOW_NAME scheduled.",
  "scheduleId" : SCHEDULE_ID,
  "status" : "success"
}
An example failure response:
{
  "message" : "Cron expression must exist.",
  "status" : "error"
}
{
  "message" : "Permission denied. Cannot execute FLOW_NAME",
  "status" : "error"
}
An example failure response for invalid cron expression:
{
  "message" : "This expression <*****> can not be parsed to quartz cron.",
  "status" : "error"
}
Fetch a Schedule
Given a project id and a flow id, this API call fetches the schedule.
- Method: GET
- Request URL: /schedule?ajax=fetchSchedule
- Parameter Location: Request Query String
Request Parameters
| Parameter | Description |
|---|---|
| session.id | The user session id. |
| ajax=fetchSchedule | The fixed parameter indicating the schedule. |
| projectId | The id of the project. |
| flowId | The name of the flow. |
Here's a curl command sample:
curl -k --get --data "session.id=XXXXXXXXXXXXXX&ajax=fetchSchedule&projectId=1&flowId=test" http://localhost:8081/scheduleAn example success response:
{
  "schedule" : {
    "cronExpression" : "0 * 9 ? * *",
    "nextExecTime" : "2017-04-01 09:00:00",
    "period" : "null",
    "submitUser" : "azkaban",
    "executionOptions" : {
      "notifyOnFirstFailure" : false,
      "notifyOnLastFailure" : false,
      "failureEmails" : [ ],
      "successEmails" : [ ],
      "pipelineLevel" : null,
      "queueLevel" : 0,
      "concurrentOption" : "skip",
      "mailCreator" : "default",
      "memoryCheck" : true,
      "flowParameters" : {
      },
      "failureAction" : "FINISH_CURRENTLY_RUNNING",
      "failureEmailsOverridden" : false,
      "successEmailsOverridden" : false,
      "pipelineExecutionId" : null,
      "disabledJobs" : [ ]
    },
    "scheduleId" : "3",
    "firstSchedTime" : "2017-03-31 11:45:21"
  }
}
If there is no schedule, empty response returns.
{}
Unschedule a Flow
This API call unschedules a flow.
- Method: POST
- Request URL: /schedule?action=removeSched
- Parameter Location: Request Query String
Request Parameters
| Parameter | Description |
|---|---|
| session.id | The user session id. |
| action=removeSched | The fixed parameter indicating the action is to unschedule a flow. |
| scheduleId | The id of the schedule. You can find this in the Azkaban UI on the /schedule page. |
Here's a curl command sample:
curl -k https://HOST:PORT/schedule -d "action=removeSched&scheduleId=SCHEDULE_ID" -b azkaban.browser.session.id=SESSION_IDAn example success response:
{
  "message" : "flow FLOW_NAME removed from Schedules.",
  "status" : "success"
}
An example failure response:
{
  "message" : "Schedule with ID SCHEDULE_ID does not exist",
  "status" : "error"
}
Set a SLA
This API call sets a SLA.
- Method: POST
- Request URL: /schedule?ajax=setSla
- Parameter Location: Request Query String
Request Parameters
| Parameter | Description |
|---|---|
| session.id | The user session id. |
| ajax=setSla | The fixed parameter indicating the action is to set a SLA. |
| scheduleId | The id of the shchedule. You can find this with Fetch a Schedule. |
| slaEmails | A list of SLA alert emails.
Example: slaEmails=a@example.com;b@example.com |
| settings[...] | Rules of SLA. Format is settings[...]=[id],[rule],[duration],[emailAction],[killAction].
Example: settings[0]=aaa,SUCCESS,5:00,true,false |
Here's a curl command sample:
curl -k -d "ajax=setSla&scheduleId=1&slaEmails=a@example.com;b@example.com&settings[0]=aaa,SUCCESS,5:00,true,false&settings[1]=bbb,SUCCESS,10:00,false,true" -b "azkaban.browser.session.id=XXXXXXXXXXXXXX" "http://localhost:8081/schedule"An example success response:
{}
An example failure response:
{
  "error" : "azkaban.scheduler.ScheduleManagerException: Unable to parse duration for a SLA that needs to take actions!"
}
Fetch a SLA
Given a schedule id, this API call fetches the SLA.
- Method: GET
- Request URL: /schedule?ajax=slaInfo
- Parameter Location: Request Query String
Request Parameters
| Parameter | Description |
|---|---|
| session.id | The user session id. |
| ajax=slaInfo | The fixed parameter indicating the SLA. |
| scheduleId | The id of the shchedule. You can find this with Fetch a Schedule. |
Here's a curl command sample:
curl -k --get --data "session.id=XXXXXXXXXXXXXX&ajax=slaInfo&scheduleId=1" http://localhost:8081/schedule"An example success response:
{
  "settings" : [ {
    "duration" : "300m",
    "rule" : "SUCCESS",
    "id" : "aaa",
    "actions" : [ "EMAIL" ]
  }, {
    "duration" : "600m",
    "rule" : "SUCCESS",
    "id" : "bbb",
    "actions" : [ "KILL" ]
  } ],
  "slaEmails" : [ "a@example.com", "b@example.com" ],
  "allJobNames" : [ "aaa", "ccc", "bbb", "start", "end" ]
}
Pause a Flow Execution
Given an execution id, this API pauses a running flow. If an execution has already been paused, it will not return any error; if an execution is not running, it will return an error message.
- Method: GET
- Request URL: /executor?ajax=pauseFlow
- Parameter Location: Request Query String
Request Parameters
| Parameter | Description |
|---|---|
| session.id |
The user session id. |
| ajax=pauseFlow |
The fixed parameter indicating the current ajax action is pauseFlow. |
| execid |
The execution id. |
Here's a curl command sample:
curl -k --data "session.id=34ba08fd-5cfa-4b65-94c4-9117aee48dda&ajax=pauseFlow&execid=303" https://localhost:8443/executorA response sample (if succeeds, or pauseFlow is called multiple times):
{ }
A response sample (if fails, only when the flow is not actually running):
{
  "error" : "Execution 303 of flow test isn't running."
}
Resume a Flow Execution
Given an execution id, this API resumes a paused running flow. If an execution has already been resumed, it will not return any errors; if an execution is not runnning, it will return an error message.
- Method: GET
- Request URL: /executor?ajax=resumeFlow
- Parameter Location: Request Query String
Request Parameters
| Parameter | Description |
|---|---|
| session.id |
The user session id. |
| ajax=resumeFlow |
The fixed parameter indicating the current ajax action is resumeFlow. |
| execid |
The execution id. |
Here's a curl command sample:
curl -k --data "session.id=34ba08fd-5cfa-4b65-94c4-9117aee48dda&ajax=resumeFlow&execid=303" https://localhost:8443/executorA response sample (if succeeds, or resumeFlow is called multiple times):
{ }
A response sample (if fails, only when the flow is not actually running):
{
  "error" : "Execution 303 of flow test isn't running."
}
Fetch a Flow Execution
Given an execution id, this API call fetches all the detailed information of that execution, including a list of all the job executions.
- Method: GET
- Request URL: /executor?ajax=fetchexecflow
- Parameter Location: Request Query String
Request Parameters
| Parameter | Description |
|---|---|
| session.id | The user session id. |
| ajax=fetchexecflow | The fixed parameter indicating the fetchexecflow action. |
| execid | The execution id to be fetched. |
Response Object
It returns a detailed information about the execution (check the example below). One thing to
notice is that the field nodes[i].in actually indicates what are the dependencies of this node.
Here's a curl command sample:
curl -k --data "session.id=34ba08fd-5cfa-4b65-94c4-9117aee48dda&ajax=fetchexecflow&execid=304" https://localhost:8443/executorA response sample:
{
  "attempt" : 0,
  "submitUser" : "1",
  "updateTime" : 1407779495095,
  "status" : "FAILED",
  "submitTime" : 1407779473318,
  "projectId" : 192,
  "flow" : "test",
  "endTime" : 1407779495093,
  "type" : null,
  "nestedId" : "test",
  "startTime" : 1407779473354,
  "id" : "test",
  "project" : "test-azkaban",
  "nodes" : [ {
    "attempt" : 0,
    "startTime" : 1407779495077,
    "id" : "test",
    "updateTime" : 1407779495077,
    "status" : "CANCELLED",
    "nestedId" : "test",
    "type" : "command",
    "endTime" : 1407779495077,
    "in" : [ "test-foo" ]
  }, {
    "attempt" : 0,
    "startTime" : 1407779473357,
    "id" : "test-bar",
    "updateTime" : 1407779484241,
    "status" : "SUCCEEDED",
    "nestedId" : "test-bar",
    "type" : "pig",
    "endTime" : 1407779484236
  }, {
    "attempt" : 0,
    "startTime" : 1407779484240,
    "id" : "test-foobar",
    "updateTime" : 1407779495073,
    "status" : "FAILED",
    "nestedId" : "test-foobar",
    "type" : "java",
    "endTime" : 1407779495068,
    "in" : [ "test-bar" ]
  }, {
    "attempt" : 0,
    "startTime" : 1407779495069,
    "id" : "test-foo",
    "updateTime" : 1407779495069,
    "status" : "CANCELLED",
    "nestedId" : "test-foo",
    "type" : "java",
    "endTime" : 1407779495069,
    "in" : [ "test-foobar" ]
  } ],
  "flowId" : "test",
  "execid" : 304
}
Fetch Execution Job Logs
Given an execution id and a job id, this API call fetches the correponding job logs. The log text can be quite large sometimes, so this API call also expects the parameters offset and length to be specified.
- Method: GET
- Request URL: /executor?ajax=fetchExecJobLogs
- Parameter Location: Request Query String
Request Parameters
| Parameter | Description |
|---|---|
| session.id | The user session id. |
| ajax=fetchExecJobLogs | The fixed parameter indicating the fetchExecJobLogs action. |
| execid | The unique id for an execution. |
| jobId | The unique id for the job to be fetched. |
| offset | The offset for the log data. |
| length | The length of the log data. For example, if the offset set is 10 and the length is 1000, the returned log will starts from the 10th character and has a length of 1000 (less if the remaining log is less than 1000 long). |
Response Object
| Parameter | Description |
|---|---|
| data | The text data of the logs. |
| offset | The offset for the log data. |
| length | The length of the log data. |
Here's a curl command sample:
curl -k --data "session.id=9089beb2-576d-47e3-b040-86dbdc7f523e&ajax=fetchExecJobLogs&execid=297&jobId=test-foobar&offset=0&length=100" https://localhost:8443/executorA response sample:
{
  "data" : "05-08-2014 16:53:02 PDT test-foobar INFO - Starting job test-foobar at 140728278",
  "length" : 100,
  "offset" : 0
}
Fetch Flow Execution Updates
This API call fetches the updated information for an execution. It filters by lastUpdateTime which only returns job information updated afterwards.
- Method: GET
- Request URL: /executor?ajax=fetchexecflowupdate
- Parameter Location: Request Query String
Request Parameters
| Parameter | Description |
|---|---|
| session.id | The user session id. |
| ajax=fetchexecflowupdate | The fixed parameter indicating the fetch execution updates action. |
| execid | The execution id. |
| lastUpdateTime | The criteria to filter by last update time. Set the value to be -1 if all job information are needed. |
Response Object
| Parameter | Description |
|---|---|
| id | The flow id. |
| flow | The flow name. |
| startTime | The start time of this flow execution. |
| updateTime | The last updated time of this flow execution. |
| endTime | The end time of this flow execution (if it finishes). |
| status | The current status of the flow. |
| attempt | The attempt number of this flow execution. |
| nodes | Information for each execution job. Containing the following fields:
{
  "attempt": String,
  "startTime": Number,
  "id": String (the job id),
  "updateTime":Number,
  "status": String,
  "endTime": Number
}
|
Here's a curl command sample:
curl -k --data "execid=301&lastUpdateTime=-1&session.id=6668c180-efe7-46a-8dd2-e36508b440d8" https://localhost:8443/executor?ajax=fetchexecflowupdateA response sample:
{
  "id" : "test",
  "startTime" : 1407778382894,
  "attempt" : 0,
  "status" : "FAILED",
  "updateTime" : 1407778404708,
  "nodes" : [ {
    "attempt" : 0,
    "startTime" : 1407778404683,
    "id" : "test",
    "updateTime" : 1407778404683,
    "status" : "CANCELLED",
    "endTime" : 1407778404683
  }, {
    "attempt" : 0,
    "startTime" : 1407778382913,
    "id" : "test-job-1",
    "updateTime" : 1407778393850,
    "status" : "SUCCEEDED",
    "endTime" : 1407778393845
  }, {
    "attempt" : 0,
    "startTime" : 1407778393849,
    "id" : "test-job-2",
    "updateTime" : 1407778404679,
    "status" : "FAILED",
    "endTime" : 1407778404675
  }, {
    "attempt" : 0,
    "startTime" : 1407778404675,
    "id" : "test-job-3",
    "updateTime" : 1407778404675,
    "status" : "CANCELLED",
    "endTime" : 1407778404675
  } ],
  "flow" : "test",
  "endTime" : 1407778404705
}
How Tos
Force execution to an executor
Only users with admin privileges can use this override. In flow params: set "useExecutor" = EXECUTOR_ID .
Setting flow priority in multiple executor mode
Only users with admin privileges can use this property. In flow params: set "flowPriority" = PRIORITY . Higher numbers get executed first.
Enabling and Disabling Queue in multiple executor mode
Only users with admin privileges can use this action. Use curl or simply visit following URL:-
- Enable:
WEBSERVER_URL/executor?ajax=disableQueueProcessor - Disable:
WEBSERVER_URL/executor?ajax=enableQueueProcessor
Reloading executors in multiple executor mode
Only users with admin privileges can use this action. This action need at least one active executor to be successful. Use curl or simply visit following URL:-
WEBSERVER_URL/executor?ajax=reloadExecutors
Logging job logs to a Kafka cluster
Azkaban supports sending job logs to a log ingestion (such as ELK) cluster via a Kafka appender. In order to enable this in Azkaban, you will need to set two exec server properties (shown here with sample values):
azkaban.server.logging.kafka.brokerList=localhost:9092
azkaban.server.logging.kafka.topic=azkaban-logging
These configure where Azkaban can find your Kafka cluster, and also which topic to put the logs under. Failure to provide these parameters will result in Azkaban refusing to create a Kafka appender upon requesting one.
In order to configure a job to send its logs to Kafka, the following job property needs to be set to true:
azkaban.job.logging.kafka.enable=true
Jobs with this setting enabled will broadcast its log messages in JSON form to the Kafka cluster. It has the following structure:
{
  "projectname": "Project name",
  "level": "INFO or ERROR",
  "submituser": "Someone",
  "projectversion": "Project version",
  "category": "Class name",
  "message": "Some log message",
  "logsource": "userJob",
  "flowid": "ID of flow",
  "execid": "ID of execution"
}
Plugins
Azkaban is designed to be modular. We are able to plug in code to add viewer pages or execute jobs in a customizable manner. These pages will describe the azkaban-plugins that can be downloaded from the download page and how to extend Azkaban by creating your own plugins or extending an existing one.
Support for Hadoop Security
The most common adoption of Azkaban has been in the big data platforms such as Hadoop, etc. Azkaban's jobtype plugin system allows most flexible support to such systems.
Azkaban is able to support all Hadoop versions, with support for Hadoop security features; Azkaban is able to support various ecosystem components with all different versions, such as different versions of pig, hive, on the same instance.
A common pattern to achieve this is by using the HadoopSecurityManager class, which handles talking to a Hadoop cluster and take care of Hadoop security, in a secure way.
Hadoop Security with Kerberos, Hadoop Tokens
When Hadoop is used in enterprise production environment, it is advisable to have its security feature turned on, to protect your data and guard against mistakes.
Kerberos Authentication
The most common authentication provided by Apache Hadoop is via Kerberos, which requires a KDC to authenticate users and services.
A user can authenticate with KDC via username/password or use a keytab. KDC distributes a tgt to authenticated users. Hadoop services, such as name node and job tracker, can use this tgt to verify this is authenticated user.
Hadoop Tokens
Once a user is authenticated with Hadoop services, Hadoop will issue tokens to the user so that its internal services won't flood KDC. For a description of tokens, see here.
Hadoop SecurityManager
For human users, one authenticate with KDC with a kinit command. But for scheduler such as Azkaban that runs jobs on behalf as other users, it needs to acquire tokens that will be used by the users. Specific Azkaban job types should handle this, with the use of HadoopSecurityManager class.
For instance, when Azkaban loads the pig job type, it will initiate a HadoopSecurityManager that is authenticated with the desired KDC and Hadoop Cluster. The pig job type conf should specify which tokens are needed to talk to different services. At minimum it needs tokens from name node and job tracker. When a pig job starts, it will go to the HadoopSecurityManager to acquire all those tokens. When the user process finishes, the pig job type calls HadoopSecurityManager again to cancel all those tokens.
Settings Common to All Hadoop Clusters
When a user program wants to talk to a Hadoop cluster, it needs to know where are the name node and job tracker. It also needs to know how to authenticate with them. These information are all in the Hadoop config files that are normally in $HADOOP_HOME/conf. For this reason, this conf directory as well as the hadoop-core jar need to be on azkaban executor server classpath.
If you are using Hive that uses HCat as its metastore, you also need relevant hive jars and hive conf on the classpath as well.
Native Library
Most likely your Hadoop platform depends on some native library, this should be specified in java.library.path in azkaban executor server.
temp dir
Besides those, many tools on Hadoop, such as Pig/Hive/Crunch write files into temporary directory. By default, they all go to /tmp. This could cause operations issue when a lot of jobs run concurrently. Because of this, you may want to change this by setting java.io.tmp.dir to a different directory.
Settings To Talk to UNSECURE Hadoop Cluster
If you are just starting out with Hadoop, chances are you don't have kerberos authentication for your Hadoop. Depending on whether you want to run everything as azkaban user (or whatever user started the azkaban executor server), you can do the following settings:
- If you started the executor server with user named azkaban, and you want to run all the jobs as azkaban on Hadoop, just set
azkaban.should.proxy=falseandobtain.binary.token=false - If you started the executor server with user named azkaban, but you want to run Hadoop jobs as their individual users, you need to set
azkaban.should.proxy=trueandobtain.binary.token=false
Settings To Talk to SECURE Hadoop Cluster
For secure Hadoop clusters, Azkaban needs its own kerberos keytab to authenticate with KDC. Azkaban job types should acquire necessary Hadoop tokens before user job process starts, and should cancel the tokens after user job finishes.
All job type specific settings should go to their respective plugin conf files. Some of the common settings can go to commonprivate.properties and common.properties.
For instance, Hadoop job types usually require name node tokens and job tracker tokens. These can go to commonpriate.properties.
Azkaban as proxy user
The following settings are needed for HadoopSecurityManager to authenticate with KDC:
proxy.user=YOUR_AZKABAN_KERBEROS_PRINCIPAL
This principal should also be set in core-site.xml in Hadoop conf with corresponding permissions.
proxy.keytab.location=KEYTAB_LOCATION
One should verify if the proxy user and keytab works with the specified KDC.
Obtaining tokens for user jobs
Here are what's common for most Hadoop jobs
hadoop.security.manager.class=azkaban.security.HadoopSecurityManager_H_1_0
This implementation should work with Hadoop 1.x
azkaban.should.proxy=true
obtain.binary.token=true
obtain.namenode.token=true
obtain.jobtracker.token=true
Additionally, if your job needs to talk to HCat, for example if you have Hive installed with uses kerbrosed HCat, or your pig job needs to talk to HCat, you will need to set for those Hive job types
obtain.hcat.token=true
This makes HadoopSecurityManager acquire a HCat token as well.
Making a New Job Type on Secure Hadoop Cluster
If you are making a new job type that will talk to Hadoop Cluster, you can use the HadoopSecurityManager to take care of security.
For unsecure Hadoop cluster, there is nothing special that is needed.
For secure Hadoop clusters, there are two ways inlcuded in the hadoopsecuritymanager package:
- give the key tab information to user job process. The hadoopsecuritymanager static method takes care of login from that common keytab and proxy to the user. This is convenient for prototyping as there will be a real tgt granted to the user job. The con side is that the user could potentially use the keytab to login and proxy as someone else, which presents a security hole.
- obtain Hadoop tokens prior to user job process start. The job wrapper will pick up these binary tokens inside user job process. The tokens should be explicitly cancelled after user job finishes.
By paring properly configured hadoopsecuritymanager with basic job types such as hadoopJava, pig, hive, one can make these job types work with different versions of Hadoop with various security settings.
Included in the azkaban-plugins is the hadoopsecuritymanager for Hadoop-1.x versions. It is not compatible with Hadoop-0.20 and prior versions as Hadoop UGI is not backwards compatible. However, it should not be difficult to implement one that works with them. Going forward, Hadoop UGI is mostly backwards compatible and one only needs to recompile hadoopsecuritymanager package with newer versions of Hadoop.
Azkaban HDFS Browser
The Azkaban HDFS Browser is a plugin that allows you to view the HDFS FileSystem and decode several file types. It was originally created at LinkedIn to view Avro files, Linkedin's BinaryJson format and text files. As this plugin matures further, we may add decoding of different file types in the future.

Setup
Download the HDFS plugin from the download page and extract it into the web server's plugin's directory. This is often azkaban_web_server_dir/plugins/viewer/.
Users
By default, Azkaban HDFS browser does a do-as to impersonate the logged-in user. Often times, data is created and handled by a headless account. To view these files, if user proxy is turned on, then the user can switch to the headless account as long as its validated by the UserManager.
Settings
These are properties to configure the HDFS Browser on the AzkabanWebServer. They can be set in azkaban_web_server_dir/plugins/viewer/hdfs/conf/plugin.properties.
| Parameter | Description | Default |
|---|---|---|
| viewer.name | The name of this viewer plugin | HDFS |
| viewer.path | The path to this viewer plugin inside viewer directory. | hdfs |
| viewer.order | The order of this viewer plugin amongst all viewer plugins. | 1 |
| viewer.hidden | Whether this plugin should show up on the web UI. | false |
| viewer.external.classpath | Extra jars this viewer plugin should load upon init. | extlib/* |
| viewer.servlet.class | The main servelet class for this viewer plugin. Use azkaban.viewer.hdfs.HdfsBrowserServlet for hdfs browser |
|
| hadoop.security.manager.class | The class that handles talking to hadoop clusters. Use azkaban.security.HadoopSecurityManager_H_1_0 for hadoop 1.x |
|
| azkaban.should.proxy | Whether Azkaban should proxy as individual user hadoop accounts on a secure cluster, defaults to false | false |
| proxy.user | The Azkaban user configured with kerberos and hadoop. Similar to how oozie should be configured, for secure hadoop installations | |
| proxy.keytab.location | The location of the keytab file with which Azkaban can authenticate with Kerberos for the specified proxy.user | |
| allow.group.proxy | Whether to allow users in the same headless user group to view hdfs filesystem as that headless user | false |
Azkaban Jobtype Plugins Configurations
These are properties to configure the jobtype plugins that are installed with the AzkabanExecutorServer. Note that Azkaban uses the directory structure to infer global settings versus individual jobtype specific settings. Sub-directory names also determine the job type name for running Azkaban instances.
Introduction
Jobtype plugins determine how individual jobs are actually run locally or on a remote cluster. It gives great benefits: one can add or change any job type without touching Azkaban core code; one can easily extend Azkaban to run on different hadoop versions or distributions; one can keep old versions around while adding new versions of the same types. However, it is really up to the admin who manages these plugins to make sure they are installed and configured correctly.
Upon AzkabanExecutorServer start up, Azkaban will try to load all the job type plugins it can find. Azkaban will do very simply tests and drop the bad ones. One should always try to run some test jobs to make sure the job types really work as expected.
Global Properties
One can pass global settings to all job types, including cluster dependent settings that will be used by all job types. These settings can also be specified in each job type's own settings as well.
Private settings
One can pass global settings that are needed by job types but should not be accessible by user code in commonprivate.properties. For example, the following settings are often needed for a hadoop cluster:
| Parameter | Description |
|---|---|
| hadoop.security.manager.class | The hadoopsecuritymanager that handles talking to a hadoop cluseter. Use azkaban.security.HadoopSecurityManager_H_1_0 for 1.x versions |
| azkaban.should.proxy | Whether Azkaban should proxy as individual user hadoop accounts, or run as the Azkaban user itself, defaults to true |
| proxy.user | The Azkaban user configured with kerberos and hadoop. Similar to how oozie should be configured, for secure hadoop installations |
| proxy.keytab.location | The location of the keytab file with which Azkaban can authenticate with Kerberos for the specified proxy.user |
| jobtype.global.classpath | The jars or xml resources every job type should have on their classpath. (e.g. ${hadoop.home}/hadoop-core-1.0.4.jar,${hadoop.home}/conf) |
| jobtype.global.jvm.args | The jvm args that every job type should have to jvm. |
| hadoop.home | The $HADOOP_HOME setting. |
Public settings
One can pass global settings that are needed by job types and can be visible by user code, in common.properties. For example, hadoop.home should normally be passed along to user programs.
Settings for individual job types
In most cases, there is no extra settings needed for job types to work, other than variables like hadoop.home, pig.home, hive.home, etc. However, it is also where most of the customizations come from. For example, one can configure a two Java job types with the same jar resources but with different hadoop configurations, thereby submitting pig jobs to different clusters. One can also configure pig job with pre-registered jars and namespace imports for specific organizations. Also to be noted: in the list of common job type plugins, we have included different pig versions. The admin needs to make a soft link to one of them, such as
$ ln -s pig-0.10.1 pig
so that the users can use a default "pig" type.
Jobtypes
Azkaban job type plugin design provides great flexibility for developers to create any type of job executors which can work with essentially all types of systems -- all managed and triggered by the core Azkaban work flow management.
Here we provide a common set of plugins that should be useful to most hadoop related use cases, as well as sample job packages. Most of these job types are being used in LinkedIn's production clusters, only with different configurations. We also give a simple guide how one can create new job types, either from scratch or by extending the old ones.
Command Job Type (built-in)
The command job type is one of the basic built-in types. It runs multiple UNIX commands using java processbuilder. Upon execution, Azkaban spawns off a process to run the command.
How To Use
One can run one or multiple commands within one command job. Here is what is needed:
| Type | Command |
|---|---|
| command | The full command to run |
For multiple commands, do it like command.1, command.2, etc.
Sample Job Package
Here is a sample job package, just to show how it works:
Download command.zip (Uploaded May 13, 2013)HadoopShell Job Type
In large part, this is the same Command type. The difference is its ability to talk to a Hadoop cluster securely, via Hadoop tokens.
The HadoopShell job type is one of the basic built-in types. It runs multiple UNIX commands using java processbuilder. Upon execution, Azkaban spawns off a process to run the command.
How To Use
The HadoopShell job type talks to a secure cluster via Hadoop tokens. The admin should specify obtain.binary.token=true if the Hadoop cluster security is turned on. Before executing a job, Azkaban will obtain name node token and job tracker tokens for this job. These tokens will be written to a token file, to be picked up by user job process during its execution. After the job finishes, Azkaban takes care of canceling these tokens from name node and job tracker.
Since Azkaban only obtains the tokens at the beginning of the job run, and does not requesting new tokens or renew old tokens during the execution, it is important that the job does not run longer than configured token life.
One can run one or multiple commands within one command job. Here is what is needed:
| Type | Command |
|---|---|
| command | The full command to run |
For multiple commands, do it like command.1, command.2, etc.
Here are some common configurations that make a hadoopShell job for a user:
| Parameter | Description |
|---|---|
| type | The type name as set by the admin, e.g. hadoopShell |
| dependencies | The other jobs in the flow this job is dependent upon. |
| user.to.proxy | The Hadoop user this job should run under. |
| hadoop-inject.FOO | FOO is automatically added to the Configuration of any Hadoop job launched. |
Here are what's needed and normally configured by the admin:
| Parameter | Description |
|---|---|
| hadoop.security.manager.class | The class that handles talking to Hadoop clusters. |
| azkaban.should.proxy | Whether Azkaban should proxy as individual user Hadoop accounts. |
| proxy.user | The Azkaban user configured with kerberos and Hadoop, for secure clusters. |
| proxy.keytab.location | The location of the keytab file with which Azkaban can authenticate with Kerberos for the specified proxy.user |
| obtain.binary.token | Whether Azkaban should request tokens. Set this to true for secure clusters. |
Java Job Type
The java job type was widely used in the original Azkaban as a built-in type. It is no longer a built-in type in Azkaban2. The javaprocess is still built-in in Azkaban2. The main difference between java and javaprocess job types are:
javaprocessruns user program that has a "main" method,javaruns Azkaban provided main method which invokes user program "run" method.- Azkaban can do the setup, such as getting Kerberos ticket or requesting Hadoop tokens in the provided main in
javatype, whereas injavaprocessuser is responsible for everything.
As a result, most users use java type for running anything that talks to Hadoop clusters. That usage should be replaced by hadoopJava type now, which is secure. But we still keep java type in the plugins for backwards compatibility.
How to Use
Azkaban spawns a local process for the java job type that runs user programs. It is different from the "javaprocess" job type in that Azkaban already provides a main method, called JavaJobRunnerMain. Inside JavaJobRunnerMain, it looks for the run method which can be specified by method.run (default is run). User can also specify a cancel method in the case the user wants to gracefully terminate the job in the middle of the run.
For the most part, using java type should be no different from hadoopJava.
Sample Job
Please refer to the hadoopJava type.
hadoopJava Type
In large part, this is the same java type. The difference is its ability to talk to a Hadoop cluster securely, via Hadoop tokens. Most Hadoop job types can be created by running a hadoopJava job, such as Pig, Hive, etc.
How To Use
The hadoopJava type runs user java program after all. Upon execution, it tries to construct an object that has the constructor signature of constructor(String, Props) and runs its run method. If user wants to cancel the job, it tries the user defined cancel method before doing a hard kill on that process.
The hadoopJava job type talks to a secure cluster via Hadoop tokens. The admin should specify obtain.binary.token=true if the Hadoop cluster security is turned on. Before executing a job, Azkaban will obtain name node token and job tracker tokens for this job. These tokens will be written to a token file, to be picked up by user job process during its execution. After the job finishes, Azkaban takes care of canceling these tokens from name node and job tracker.
Since Azkaban only obtains the tokens at the beginning of the job run, and does not requesting new tokens or renew old tokens during the execution, it is important that the job does not run longer than configured token life.
If there are multiple job submissions inside the user program, the user should also take care not to have a single MR step cancel the tokens upon completion, thereby failing all other MR steps when they try to authenticate with Hadoop services.
In many cases, it is also necessary to add the following code to make sure user program picks up the Hadoop tokens in "conf" or "jobconf" like the following:
// Suppose this is how one gets the conf
Configuration conf = new Configuration();

if (System.getenv("HADOOP_TOKEN_FILE_LOCATION") != null) {
    conf.set("mapreduce.job.credentials.binary", System.getenv("HADOOP_TOKEN_FILE_LOCATION"));
}
Here are some common configurations that make a hadoopJava job for a user:
| Parameter | Description |
|---|---|
| type | The type name as set by the admin, e.g. hadoopJava |
| job.class | The fully qualified name of the user job class. |
| classpath | The resources that should be on the execution classpath, accessible to the local filesystem. |
| main.args | Main arguments passed to user program. |
| dependencies | The other jobs in the flow this job is dependent upon. |
| user.to.proxy | The Hadoop user this job should run under. |
| method.run | The run method, defaults to run() |
| method.cancel | The cancel method, defaults to cancel() |
| getJobGeneratedProperties | The method user should implement if the output properties should be picked up and passed to the next job. |
| jvm.args | The -D for the new jvm process |
| hadoop-inject.FOO | FOO is automatically added to the Configuration of any Hadoop job launched. |
Here are what's needed and normally configured by the admin:
| Parameter | Description |
|---|---|
| hadoop.security.manager.class | The class that handles talking to Hadoop clusters. |
| azkaban.should.proxy | Whether Azkaban should proxy as individual user Hadoop accounts. |
| proxy.user | The Azkaban user configured with kerberos and Hadoop, for secure clusters. |
| proxy.keytab.location | The location of the keytab file with which Azkaban can authenticate with Kerberos for the specified proxy.user |
| hadoop.home | The Hadoop home where the jars and conf resources are installed. |
| jobtype.classpath | The items that every such job should have on its classpath. |
| jobtype.class | Should be set to azkaban.jobtype.HadoopJavaJob |
| obtain.binary.token | Whether Azkaban should request tokens. Set this to true for secure clusters. |
Since Azkaban job types are named by their directory names, the admin should also make those naming public and consistent.
Sample Job Package
Here is a sample job package that does a word count. It relies on a Pig job to first upload the text file onto HDFS. One can also manually upload a file and run the word count program alone.The source code is in azkaban-plugins/plugins/jobtype/src/azkaban/jobtype/examples/java/WordCount.java
Pig Type
Pig type is for running Pig jobs. In the azkaban-plugins repo, we have included Pig types from pig-0.9.2 to pig-0.11.0. It is up to the admin to alias one of them as the pig type for Azkaban users.
Pig type is built on using hadoop tokens to talk to secure Hadoop clusters. Therefore, individual Azkaban Pig jobs are restricted to run within the token's lifetime, which is set by Hadoop admins. It is also important that individual MR step inside a single Pig script doesn't cancel the tokens upon its completion. Otherwise, all following steps will fail on authentication with job tracker or name node.
Vanilla Pig types don't provide all udf jars. It is often up to the admin who sets up Azkaban to provide a pre-configured Pig job type with company specific udfs registered and name space imported, so that the users don't need to provide all the jars and do the configurations in their specific Pig job conf files.
How to Use
The Pig job runs user Pig scripts. It is important to remember, however, that running any Pig script might require a number of dependency libraries that need to be placed on local Azkaban job classpath, or be registered with Pig and carried remotely, or both. By using classpath settings, as well as pig.additional.jars and udf.import.list, the admin can create a Pig job type that has very different default behavior than the most basic "pig" type. Pig jobs talk to a secure cluster via hadoop tokens. The admin should specify obtain.binary.token=true if the hadoop cluster security is turned on. Before executing a job, Azkaban will obtain name node and job tracker tokens for this job. These tokens will be written to a token file, which will be picked up by user job process during its execution. For Hadoop 1 (HadoopSecurityManager_H_1_0), after the job finishes, Azkaban takes care of canceling these tokens from name node and job tracker. In Hadoop 2 (HadoopSecurityManager_H_2_0), due to issues with tokens being canceled prematurely, Azkaban does not cancel the tokens.
Since Azkaban only obtains the tokens at the beginning of the job run, and does not request new tokens or renew old tokens during the execution, it is important that the job does not run longer than configured token life. It is also important that individual MR step inside a single Pig script doesn't cancel the tokens upon its completion. Otherwise, all following steps will fail on authentication with hadoop services. In Hadoop 2, you may need to set -Dmapreduce.job.complete.cancel.delegation.tokens=false to prevent tokens from being canceled prematurely.
Here are the common configurations that make a Pig job for a user:
| Parameter | Description |
|---|---|
| type | The type name as set by the admin, e.g. pig |
| pig.script | The Pig script location. e.g. src/wordcountpig.pig |
| classpath | The resources that should be on the execution classpath, accessible to the local filesystem. |
| dependencies | The other jobs in the flow this job is dependent upon. |
| user.to.proxy | The hadoop user this job should run under. |
| pig.home | The Pig installation directory. Can be used to override the default set by Azkaban. |
| param.SOME_PARAM | Equivalent to Pig's -param |
| use.user.pig.jar | If true, will use the user-provided Pig jar to launch the job. If false, the Pig jar provided by Azkaban will be used. Defaults to false. |
| hadoop-inject.FOO | FOO is automatically added to the Configuration of any Hadoop job launched. |
Here are what's needed and normally configured by the admin:
| Parameter | Description |
|---|---|
| hadoop.security.manager.class | The class that handles talking to hadoop clusters. |
| azkaban.should.proxy | Whether Azkaban should proxy as individual user hadoop accounts. |
| proxy.user | The Azkaban user configured with kerberos and hadoop, for secure clusters. |
| proxy.keytab.location | The location of the keytab file with which Azkaban can authenticate with Kerberos for the specified proxy.user |
| hadoop.home | The hadoop home where the jars and conf resources are installed. |
| jobtype.classpath | The items that every such job should have on its classpath. |
| jobtype.class | Should be set to azkaban.jobtype.HadoopJavaJob |
| obtain.binary.token | Whether Azkaban should request tokens. Set this to true for secure clusters. |
Dumping MapReduce Counters: this is useful in the case where a Pig script uses UDFs, which may add a few custom MapReduce counters
| Parameter | Description |
|---|---|
| pig.dump.hadoopCounter | Setting the value of this parameter to true will trigger the dumping of MapReduce counters for each of the generated MapReduce job generated by the Pig script. |
Since Pig jobs are essentially Java programs, the configurations for Java jobs could also be set.
Since Azkaban job types are named by their directory names, the admin should also make those naming public and consistent. For example, while there are multiple versions of Pig job types, the admin can link one of them as pig for default Pig type. Experimental Pig versions can be tested in parallel with a different name and can be promoted to default Pig type if it is proven stable. In LinkedIn, we also provide Pig job types that have a number of useful udf libraries, including datafu and LinkedIn specific ones, pre-registered and imported, so that users in most cases will only need Pig scripts in their Azkaban job packages.
Sample Job Package
Here is a sample job package that does word count. It assumes you have hadoop installed and gets some dependency jars from $HADOOP_HOME:
Hive Type
The hive type is for running Hive jobs. In the azkaban-plugins repo, we have included hive type based on hive-0.8.1. It should work for higher version Hive versions as well. It is up to the admin to alias one of them as the hive type for Azkaban users.
The hive type is built using Hadoop tokens to talk to secure Hadoop clusters. Therefore, individual Azkaban Hive jobs are restricted to run within the token's lifetime, which is set by Hadoop admin. It is also important that individual MR step inside a single Pig script doesn't cancel the tokens upon its completion. Otherwise, all following steps will fail on authentication with the JobTracker or NameNode.
How to Use
The Hive job runs user Hive queries. The Hive job type talks to a secure cluster via Hadoop tokens. The admin should specify obtain.binary.token=true if the Hadoop cluster security is turned on. Before executing a job, Azkaban will obtain NameNode and JobTracker tokens for this job. These tokens will be written to a token file, which will be picked up by user job process during its execution. After the job finishes, Azkaban takes care of canceling these tokens from NameNode and JobTracker.
Since Azkaban only obtains the tokens at the beginning of the job run, and does not request new tokens or renew old tokens during the execution, it is important that the job does not run longer than configured token life. It is also important that individual MR step inside a single Pig script doesn't cancel the tokens upon its completion. Otherwise, all following steps will fail on authentication with Hadoop services.
Here are the common configurations that make a hive job for single line Hive query:
| Parameter | Description |
|---|---|
| type | The type name as set by the admin, e.g. hive |
| azk.hive.action | use execute.query |
| hive.query | Used for single line hive query. |
| user.to.proxy | The hadoop user this job should run under. |
Specify these for a multi-line Hive query:
| Parameter | Description |
|---|---|
| type | The type name as set by the admin, e.g. hive |
| azk.hive.action | use execute.query |
| hive.query.01 | fill in the individual hive queries, starting from 01 |
| user.to.proxy | The Hadoop user this job should run under. |
Specify these for query from a file:
| Parameter | Description |
|---|---|
| type | The type name as set by the admin, e.g. hive |
| azk.hive.action | use execute.query |
| hive.query.file | location of the query file |
| user.to.proxy | The Hadoop user this job should run under. |
Here are what's needed and normally configured by the admin. The following properties go into private.properties:
| Parameter | Description |
|---|---|
| hadoop.security.manager.class | The class that handles talking to hadoop clusters. |
| azkaban.should.proxy | Whether Azkaban should proxy as individual user hadoop accounts. |
| proxy.user | The Azkaban user configured with kerberos and hadoop, for secure clusters. |
| proxy.keytab.location | The location of the keytab file with which Azkaban can authenticate with Kerberos for the specified proxy.user |
| hadoop.home | The hadoop home where the jars and conf resources are installed. |
| jobtype.classpath | The items that every such job should have on its classpath. |
| jobtype.class | Should be set to azkaban.jobtype.HadoopJavaJob |
| obtain.binary.token | Whether Azkaban should request tokens. Set this to true for secure clusters. |
| hive.aux.jars.path | Where to find auxiliary library jars |
| env.HADOOP_HOME | $HADOOP_HOME |
| env.HIVE_HOME | $HIVE_HOME |
| env.HIVE_AUX_JARS_PATH | ${hive.aux.jars.path} |
| hive.home | $HIVE_HOME |
| hive.classpath.items | Those that needs to be on hive classpath, include the conf directory |
These go into plugin.properties
| Parameter | Description |
|---|---|
| job.class | azkaban.jobtype.hiveutils.azkaban.HiveViaAzkaban |
| hive.aux.jars.path | Where to find auxiliary library jars |
| env.HIVE_HOME | $HIVE_HOME |
| env.HIVE_AUX_JARS_PATH | ${hive.aux.jars.path} |
| hive.home | $HIVE_HOME |
| hive.jvm.args | -Dhive.querylog.location=. -Dhive.exec.scratchdir=YOUR_HIVE_SCRATCH_DIR -Dhive.aux.jars.path=${hive.aux.jars.path} |
Since hive jobs are essentially java programs, the configurations for Java jobs could also be set.
Sample Job Package
Here is a sample job package. It assumes you have hadoop installed and gets some dependency jars from $HADOOP_HOME. It also assumes you have Hive installed and configured correctly, including setting up a MySQL instance for Hive Metastore.
New Hive Jobtype
We've added a new Hive jobtype whose jobtype class is azkaban.jobtype.HadoopHiveJob. The configurations have changed from the old Hive jobtype.
Here are the configurations that a user can set:
| Parameter | Description |
|---|---|
| type | The type name as set by the admin, e.g. hive |
| hive.script | The relative path of your Hive script inside your Azkaban zip |
| user.to.proxy | The hadoop user this job should run under. |
| hiveconf.FOO | FOO is automatically added as a hiveconf variable. You can reference it in your script using ${hiveconf:FOO}. These variables also get added to the configuration of any launched Hadoop jobs. |
| hivevar.FOO | FOO is automatically added as a hivevar variable. You can reference it in your script using ${hivevar:FOO}. These variables are NOT added to the configuration of launched Hadoop jobs. |
| hadoop-inject.FOO | FOO is automatically added to the Configuration of any Hadoop job launched. |
Here are what's needed and normally configured by the admin. The following properties go into private.properties (or into ../commonprivate.properties):
| Parameter | Description |
|---|---|
| hadoop.security.manager.class | The class that handles talking to hadoop clusters. |
| azkaban.should.proxy | Whether Azkaban should proxy as individual user hadoop accounts. |
| proxy.user | The Azkaban user configured with kerberos and hadoop, for secure clusters. |
| proxy.keytab.location | The location of the keytab file with which Azkaban can authenticate with Kerberos for the specified proxy.user |
| hadoop.home | The hadoop home where the jars and conf resources are installed. |
| jobtype.classpath | The items that every such job should have on its classpath. |
| jobtype.class | Should be set to azkaban.jobtype.HadoopHiveJob |
| obtain.binary.token | Whether Azkaban should request tokens. Set this to true for secure clusters. |
| obtain.hcat.token | Whether Azkaban should request HCatalog/Hive Metastore tokens. If true, the HadoopSecurityManager will acquire an HCatalog token. |
| hive.aux.jars.path | Where to find auxiliary library jars |
| hive.home | $HIVE_HOME |
These go into plugin.properties (or into ../common.properties):
| Parameter | Description |
|---|---|
| hive.aux.jars.path | Where to find auxiliary library jars |
| hive.home | $HIVE_HOME |
| jobtype.jvm.args | -Dhive.querylog.location=. -Dhive.exec.scratchdir=YOUR_HIVE_SCRATCH_DIR -Dhive.aux.jars.path=${hive.aux.jars.path} |
Since hive jobs are essentially java programs, the configurations for Java jobs can also be set.
Common Configurations
This section lists out the configurations that are common to all job types
other_namenodes
This job property is useful for jobs that need to read data from or write data to more than one Hadoop NameNode. By default Azkaban requests a HDFS_DELEGATION_TOKEN on behalf of the job for the cluster that Azkaban is configured to run on. When this property is present, Azkaban will try request a HDFS_DELEGATION_TOKEN for each of the specified HDFS NameNodes.
The value of this propety is in the form of comma separated list of NameNode URLs.
For example: other_namenodes=webhdfs://host1:50070,hdfs://host2:9000
HTTP Job Callback
The purpose of this feature to allow Azkaban to notify external systems via an HTTP upon the completion of a job. The new properties are in the following format:
- job.notification.<status>.<sequence number>.url
- job.notification.<status>.<sequence number>.method
- job.notification.<status>.<sequence number>.body
- job.notification.<status>.<sequence number>.headers
Supported values for status
- started: when a job is started
- success: when a job is completed successfully
- failure: when a job failed
- completed: when a job is either successfully completed or failed
Number of callback URLs
The maximum # of callback URLs per job is 3. So the <sequence number> can go up from 1 to 3. If a gap is detected, only the ones before the gap is used.
HTTP Method
The supported method are GET and POST. The default method is GET
Headers
Each job callback URL can optional specify headers in the following format
job.notification.<status>.<sequence number>.headers=<name>:<value>\r\n<name>:<value>The delimiter for each header is '\r\n' and delimiter between header name and value is ':'
The headers are applicable for both GET and POST job callback URLs.
Job Context Information
It is often desirable to include some dynamic context information about the job in the URL or POST request body, such as status, job name, flow name, execution id and project name. If the URL or POST request body contains any of the following tokens, they will be replaced with the actual values by Azkabn before making the HTTP callback is made. The value of each token will be HTTP encoded.
- ?{server} - Azkaban host name and port
- ?{project}
- ?{flow}
- ?{executionId}
- ?{job}
- ?{status} - possible values are started, failed, succeeded
Examples
GET HTTP Method
- job.notification.started.1.url=http://abc.com/api/v2/message?text=wow!!&job=?{job}&status=?{status}
- job.notification.completed.1.url=http://abc.com/api/v2/message?text=wow!!&job=?{job}&status=?{status}
- job.notification.completed.2.url=http://abc.com/api/v2/message?text=yeah!!
POST HTTP Method
- job.notification.started.1.url=http://abc.com/api/v1/resource
- job.notification.started.1.method=POST
- job.notification.started.1.body={"type":"workflow", "source":"Azkaban", "content":"{server}:?{project}:?{flow}:?{executionId}:?{job}:?{status}"}
- job.notification.started.1.headers=Content-type:application/json
VoldemortBuildandPush Type
Pushing data from hadoop to voldemort store used to be entirely in java. This created lots of problems, mostly due to users having to keep track of jars and dependencies and keep them up-to-date. We created the VoldemortBuildandPush job type to address this problem. Jars and dependencies are now managed by admins; absolutely no jars or java code are required from users.
How to Use
This is essentially a hadoopJava job, with all jars controlled by the admins. User only need to provide a .job file for the job and specify all the parameters. The following needs to be specified:
| Parameter | Description |
|---|---|
| type | The type name as set by the admin, e.g. VoldemortBuildandPush |
| push.store.name | The voldemort push store name |
| push.store.owners | The push store owners |
| push.store.description | Push store description |
| build.input.path | Build input path on hdfs |
| build.output.dir | Build output path on hdfs |
| build.replication.factor | replication factor number |
| user.to.proxy | The hadoop user this job should run under. |
| build.type.avro | if build and push avro data, true, otherwise, false |
| avro.key.field | if using Avro data, key field |
| avro.value.field | if using Avro data, value field |
Here are what's needed and normally configured by the admn (always put common properties in commonprivate.properties and common.properties for all job types).
These go into private.properties:
| Parameter | Description |
|---|---|
| hadoop.security.manager.class | The class that handles talking to hadoop clusters. |
| azkaban.should.proxy | Whether Azkaban should proxy as individual user hadoop accounts. |
| proxy.user | The Azkaban user configured with kerberos and hadoop, for secure clusters. |
| proxy.keytab.location | The location of the keytab file with which Azkaban can authenticate with Kerberos for the specified proxy.user |
| hadoop.home | The hadoop home where the jars and conf resources are installed. |
| jobtype.classpath | The items that every such job should have on its classpath. |
| jobtype.class | Should be set to azkaban.jobtype.HadoopJavaJob |
| obtain.binary.token | Whether Azkaban should request tokens. Set this to true for secure clusters. |
| azkaban.no.user.classpath | Set to true such that Azkaban doesn't pick up user supplied jars. |
These go into plugin.properties:
| Parameter | Description |
|---|---|
| job.class | voldemort.store.readonly.mr.azkaban.VoldemortBuildAndPushJob |
| voldemort.fetcher.protocol | webhdfs |
| hdfs.default.classpath.dir | HDFS location for distributed cache |
| hdfs.default.classpath.dir.enable | set to true if using distributed cache to ship dependency jars |
For more information
Please refer to Voldemort project site for more info.
Create Your Own Jobtypes
With plugin design of Azkaban job types, it is possible to extend Azkaban for various system environments. You should be able to execute any job under the same Azkaban work flow management and scheduling.
Creating new job types is often times very easy. Here are several ways one can do it:
New Types with only Configuration Changes
One doesn't always need to write java code to create job types for end users. Often times, configuration changes of existing job types would create significantly different behavior to the end users. For example, in LinkedIn, apart from the pig types, we also have pigLi types that come with all the useful library jars pre-registered and imported. This way, normal users only need to provide their pig scripts, and the their own udf jars to Azkaban. The pig job should run as if it is run on the gateway machine from pig grunt. In comparison, if users are required to use the basic pig job types, they will need to package all the necessary jars in the Azkaban job package, and do all the register and import by themselves, which often poses some learning curve for new pig/Azkaban users.
The same practice applies to most other job types. Admins should create or tailor job types to their specific company needs or clusters.
New Types Using Existing Job Types
If one needs to create a different job type, a good starting point is to see if this can be done by using an existing job type. In hadoop land, this most often means the hadoopJava type. Essentially all hadoop jobs, from the most basic mapreduce job, to pig, hive, crunch, etc, are java programs that submit jobs to hadoop clusters. It is usually straight forward to create a job type that takes user input and runs a hadoopJava job.
For example, one can take a look at the VoldemortBuildandPush job type. It will take in user input such as which cluster to push to, voldemort store name, etc, and runs hadoopJava job that does the work. For end users though, this is a VoldemortBuildandPush job type with which they only need to fill out the .job file to push data from hadoop to voldemort stores.
The same applies to the hive type.
New Types by Extending Existing Ones
For the most flexibility, one can always build new types by extending the existing ones. Azkaban uses reflection to load job types that implements the job interface, and tries to construct a sample object upon loading for basic testing. When executing a real job, Azkaban calls the run method to run the job, and cancel method to cancel it.
For new hadoop job types, it is important to use the correct hadoopsecuritymanager class, which is also included in azkaban-plugins repo. This class handles talking to the hadoop cluster, and if needed, requests tokens for job execution or for name node communication.
For better security, tokens should be requested in Azkaban main process and be written to a file. Before executing user code, the job type should implement a wrapper that picks up the token file, set it in the Configuration or JobConf object. Please refer to HadoopJavaJob and HadoopPigJob to see example usage.
System Statistics
Azkaban server maintains certain system statistics and they be seen http:<host>:<port>/stats
To enable this feature, add the following property "executor.metric.reports=true" to azkaban.properties
Property "executor.metric.milisecinterval.default" controls the interval at which the metrics are collected at
Statistic Types
| Metric Name | Description |
|---|---|
| NumFailedFlowMetric | Number of failed flows |
| NumRunningFlowMetric | Number of flows in the queue |
| NumQueuedFlowMetric | Number of flows in the queue |
| NumRunningJobMetric | Number of running jobs |
| NumFailedJobMetric | Number of failed jobs |
To change the statistic collection at run time, the following options are available
- To change the time interval at which the specific type of statistics are collected - /stats?action=changeMetricInterval&metricName=NumRunningJobMetric&interval=60000
- To change the duration at which the statistics are maintained -/stats?action=changeCleaningInterval&interval=604800000
- To change the number of data points to display - /stats?action=changeEmitterPoints&numInstances=50
- To enable the statistic collection - /stats?action=enableMetrics
- To disable the statistic collection - /stats?action=disableMetrics
Reload Jobtypes
When you want to make changes to your jobtype configurations or add/remove jobtypes, you can do so without restarting the executor server. You can reload all jobtype plugins as follows:
curl http://localhost:EXEC_SERVER_PORT/executor?action=reloadJobTypePlugins